|
|
This topic comprises 4 pages: 1 2 3 4
|
|
Author
|
Topic: Christie strikes again!
|
Brad Miller
Administrator

Posts: 17775
From: Plano, TX (36.2 miles NW of Rockwall)
Registered: May 99
|
 posted 02-15-2002 09:20 PM


Ok Paul, here we go. (BTW, thanks for sending in these pictures to clear things up.) 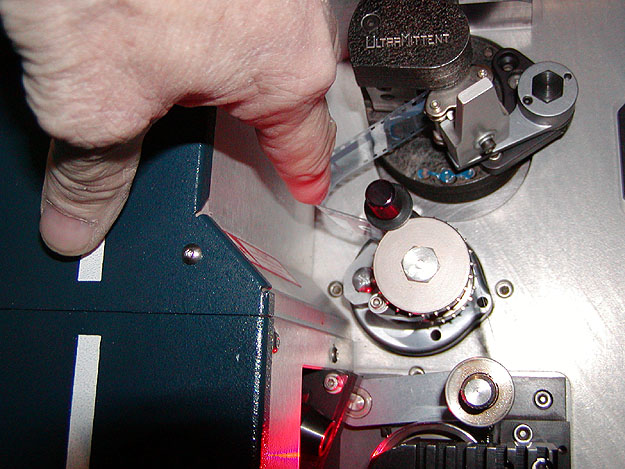
This is a picture of using the "finger" method for checking loop size. This is simply NOT the correct way to do it. The CORRECT method for a Christie projector is very clearly outlined on the second page of "Threading 101" in the "tips" section. Just because the loop cannot be stretched to hit the back wall of the projector doesn't mean that the loop won't bounce up and down and slap up against the underside of the intermittent. Fortunately though, as is noticed in this picture you sent, this model DOES have the "slap guards" installed underneath the intermittent. This means that if someone makes that loop a little bit too big, the picture will not get scratched, but still be aware that damage can be occuring to the SRD/SDDS soundtracks if threaded with "the finger" method. This is not a Christie error. This is an operator error. 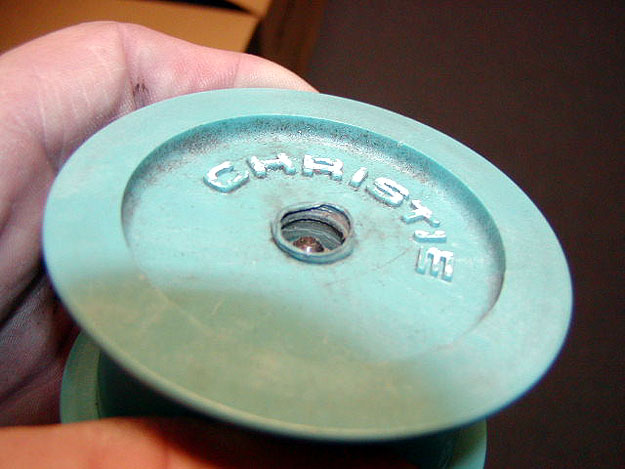
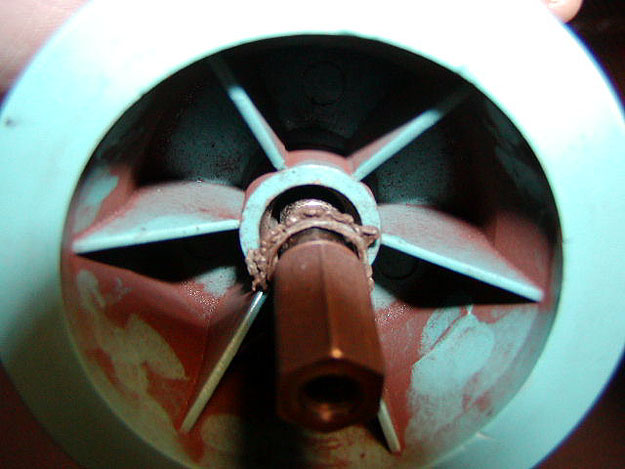
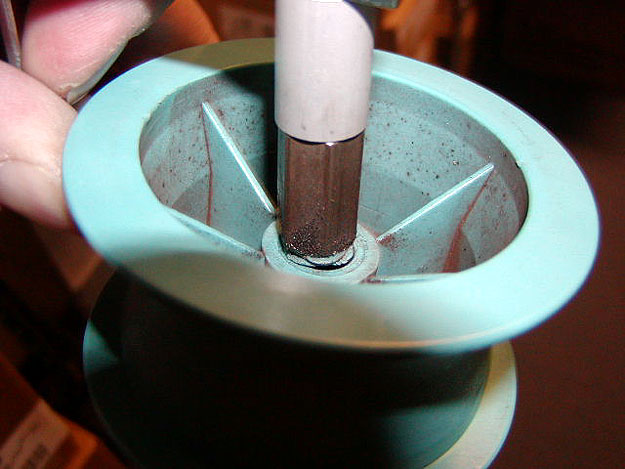
Ok, I have NEVER seen anything like this before. I am actually thinking that whatever bozos ran that booth before you got there used some kind of solvent that ended up eating away at the plastic in an attempt to clean the rollers. Has anyone else ever seen this? 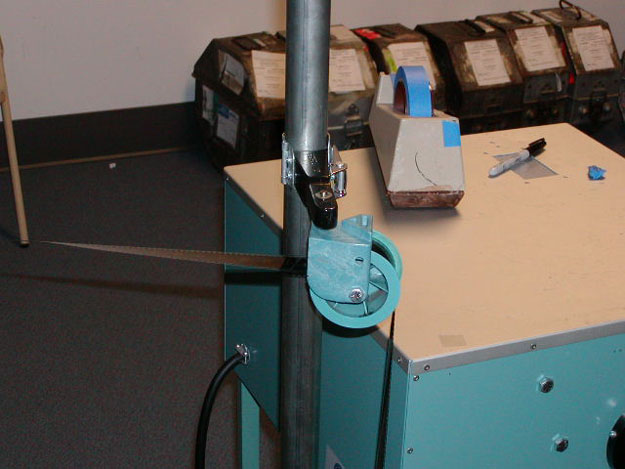
I assume this picture means that you have not watched the latest Advanced Training" video. In the video you will notice that Joe shows this is not the way to thread the make up table. This is clearly an operator error. (I mean come on, what kind of MORON would actually thread the roller like this, especially since the "open" side is away from the operator, thus making it HARDER to thread this way!) Now for the sake of argument, yes I can see where said "moron" WOULD thread the film like this, but NONE of my make up tables are like this. See the raised triangular shaped area on the top of the bracket? That is designed so that the roller can NOT be turned 180 degrees. Someone has modified this particular table and is not Christie's fault. Mine can not be turned in this manner. 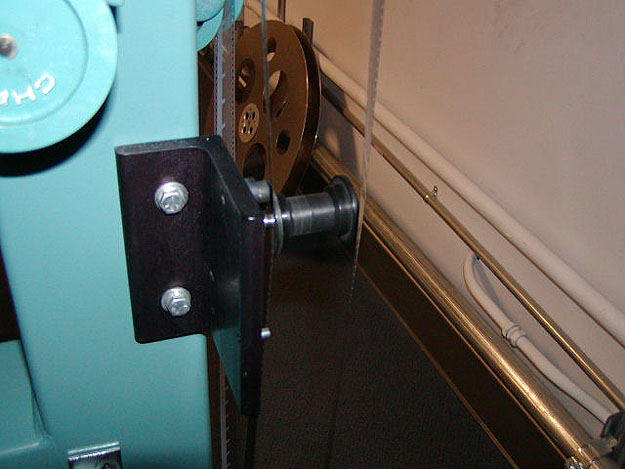
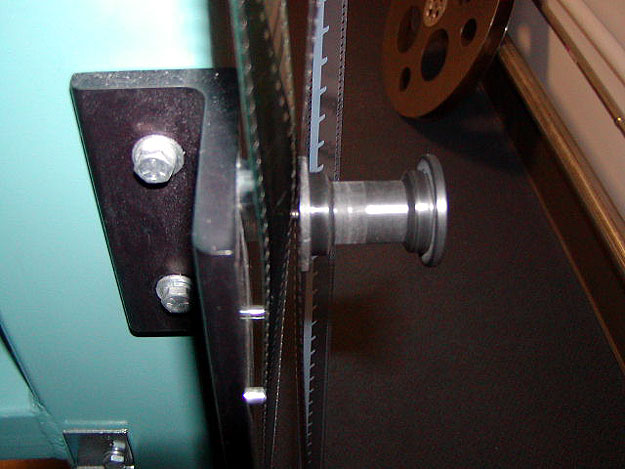
Ok, now I KNOW you did not look at the "Threading 101" page in the tips section, even though I specifically referred to it a couple of times previously in this thread. On the first page of it the threading of the film is VERY clearly shown. What is it that you are missing? Simple. You are to thread BEHIND the bracket going down and in FRONT of the bracket going up. The film does not thread on the front side of the bracket both ways. Again, an operator error and NOT Christie's fault. Have a gearless day. 
| IP: Logged
|
|
Paul G. Thompson
The Weenie Man

Posts: 4718
From: Mount Vernon WA USA
Registered: Nov 2000
|
posted 02-15-2002 10:21 PM

Brad, these pictures were of what I have seen the first time I walked into the booth while it was running. Now you know why I am there. I brought my camera in to re-inact the crime.  If things like this can happen, it will happen in other booths as well. Since we have all ages running our poorly lit booths, we try to do things to minimize the errors. The "finger" job was just trying to illustrate that the rear casting cannot be touched with the film if threaded correctly according to the manual. I still use the finger method as a check to detect any sprocket threading problems before I manually roll the machine forward. Then I usually use the finger again as a final check. After you get to know your machines, you know what feels right and what feels wrong even in the dark. This also includes loop sizes. One booth, for example, many problems such as scratched prints, mis-threads, loop bashing, pay-out head wraps, etc. simply went away when we improved the lighting situation. The film-cleaner picture was a re-inactment for picture purposes that I saw in that booth when I walked in. What bozo would thread the roller that way? Well, the one that put the print together last night did just that! Luckly, I spotted the problem before he powered up the platter.
| IP: Logged
|
|
|
|
|
|
|
|
|
|
|
|
|
|
|
|
|
|
|
|
John Pytlak
Film God

Posts: 9987
From: Rochester, NY 14650-1922
Registered: Jan 2000
|
posted 02-18-2002 10:21 AM
Gordon said: "The only correct way to thread a projector is locate Pix start on the apperture and the sync diamond over the optical reader (or over the correct mag head if that applies)"There are 20 frames between "Picture Start" frame and the 35mm "Sound Start" diamond in the SMPTE Theatre Projection Leader (standard SMPTE 301M). The analog optical sound offset on a release print is 21 frames (SMPTE 40). Having exactly 20 frames between the picture aperture and the sound reader scanning point will put the sound in sync at about 50 feet from the screen, as sound takes about 1/24 second (one frame) to travel 50 feet from the speakers to the prime audience. If that lower loop is too small, the sound sync will lag the picture; if it is too large, the sync will be ahead of the picture.
------------------
John P. Pytlak, Senior Technical Specialist
Worldwide Technical Services, Entertainment Imaging
Research Labs, Building 69, Room 7525A
Rochester, New York, 14650-1922 USA
Tel: 585-477-5325 Cell: 716-781-4036 Fax: 585-722-7243
E-Mail: john.pytlak@kodak.com
Web site: http://www.kodak.com/go/motion
| IP: Logged
|
|
Will Kutler
Phenomenal Film Handler

Posts: 1506
From: Tucson, AZ, USA
Registered: Feb 2001
|
posted 02-18-2002 01:04 PM
Brad,When threading a Christie P35GPS, the best advice I can give is to visually inspect the intermittent film loop! You do not want the film loop to slap against the intermittent or the back of the projector, yet you do not want the loop to be too small and tight. The best advice I can give is a visual common sense inspection when threading... As far as those rollers on the MUT being threaded backwards, I too have seen an adiot attemt this!
| IP: Logged
|
|
|
|
Paul G. Thompson
The Weenie Man
Posts: 4718
From: Mount Vernon WA USA
Registered: Nov 2000
|
posted 02-18-2002 04:34 PM
I have to agree with Brad on using the pad roller as a guide. But I disagree about the finger method being practically useless. Once you get to know your machines, the finger method will be very helpful in an extremely poorly lit booth, especially on other machines. Remember the dead zone that is discussed in 101.....that is when the loop will be the biggest. However, if your frame knob has been turned and the movement is at or near the bottom of the travel, a problem could exist if you have a 3 perf mis-frame. The loop will practically become non-existant, but there is enough there to keep the pad roller from popping open. I tested that, by the way. It'll run.... There was a picture I sent that Brad did not post, but if he does post it now, it can be seen that it is very important to insure threading is accomplished with the movement in the center position of its travel. Paul
| IP: Logged
|
|
|
|
All times are Central (GMT -6:00)
|
This topic comprises 4 pages: 1 2 3 4
|
Powered by Infopop Corporation
UBB.classicTM
6.3.1.2
The Film-Tech Forums are designed for various members related to the cinema industry to express their opinions, viewpoints and testimonials on various products, services and events based upon speculation, personal knowledge and factual information through use, therefore all views represented here allow no liability upon the publishers of this web site and the owners of said views assume no liability for any ill will resulting from these postings. The posts made here are for educational as well as entertainment purposes and as such anyone viewing this portion of the website must accept these views as statements of the author of that opinion
and agrees to release the authors from any and all liability.
|

 Home
Home








 Printer-friendly view of this topic