This is topic Aperture plate filing...help please. in forum Film Handlers' Forum at Film-Tech Forum ARCHIVE.
To visit this topic, use this URL:
https://ft-forum.com/ft/cgi-bin/ubb/ultimatebb.cgi?ubb=get_topic;f=1;t=007222
Posted by Eric Robinson (Member # 2966) on 05-24-2005, 03:54 PM:
I have just started filing aperture plates for Simplex 35 projectors. I didn't have anyone around to teach me, so I learned the hard way. First I learned that the masking should be set to the correct format before filing. Next I learned that the picture should be focused before filing (I was using white light...no film.) And of course I learned that the picture is upside down and flipped left to right. Lots of fun I did have and such butchery I reaped upon the plates with my cheap triangular file. After much pain and practice I have graduated to using a better file and recently picked up a nibbler.
The problem I am having now is that when I file an aperture plate, the resulting image on screen when the movie starts is either light bleeding to far onto the masking or shadows around the edges. I have tried using white light only, RP40 image test film, green stripe film, and once I even used part of a trailer to make a loop.
Generally I try to file the plate until there is only a slight shadow around the edges. I then very carefully file it until the shadow is completely gone, but then I notice the image is bleeding far off (about a foot) onto the masking.
Any hints or suggestions would help me greatly.
Regards...Eric
Posted by Mark Gulbrandsen (Member # 72) on 05-24-2005, 05:12 PM:
Also.... Don't forget to mark the center of the screen with a piece of masking tape placed down on the lower masking. Then(assuming you have turretts) while running a loop of RP-40 center each formats lens horizontally to the tape. This way both formats will line up on screen center when changed. If you have single mount machines than each lens will have to be shimmed as best as possible to get the image where it belongs... sometimes with old 4" adapters this is not possible and new may have to be procured.
Yo also will need to get yourself a file with no serrations on the edge such as the file that LaVezzi sells. This file also has just the right "cut" for filing brass. This file will also allow you to do perfectly square corners if needed. File the edges at a slight bevel so you end up with a sharp edge just behind the film.
Its sometimes normal to have at least a tiny bit of bleed over on the masking, but definately not an excessive amount. This is the only way you can get a clean edge with most projectors. On scope format it may be nnecessary to go a bit onto the left and right maksing as the 2X expansion of the anamorphic also expands out the blurry edge of the plate, this blurry edge should be carried out onto the masking itself so the image looks clean.
P.S. filing plates is an art in and of itself and takes alot of practice!!
Hope this helps.....
Mark @ CLACO
Posted by Eric Robinson (Member # 2966) on 05-24-2005, 06:13 PM:
Hi Mark,
Thanks for the quick reply. I have read many of your postings here at film-tech.
Yes, all the turrets I service have two lens barrels. Next time I start filing aperture plates I'll start first aligning each image to the center of the screen. What I usually do; however, is use image test film to set the horizontal position of the picture. The image test film has an arrow on the left and right which indicate where the edge of the screen should be. If it turns out that the image is too small for the masking, I push the picture to the left until the arrow touches the left edge of masking. For some reason (on a few projectors) setting it this way and then filing the aperture plate until the shadow just disappears on the left edge causes the soundtrack to show up on the curtains...I can't figure out why.
As for my file, I found an automotive point filing file with a smooth edge so I can cut square corners. I will look into the LaVezzi style though. So far I have been filing the aperture edge at an angle, but have never been consistent about which way the angle faces, could this be causing some shadow problems?
I am still interesting in finding out what type of image I should be casting while filing an aperture plate. I am hesitant to use the RP40 because you won't know if the soundtrack is going to pop out on the curtains after you've finished the job.
Thanks,
ERIC
Posted by Jason M Miller (Member # 2597) on 05-24-2005, 06:53 PM:
Now I am new at this but I believe I am correct, the RP40 film has the correct aspect ratio lines on the film so if you cut your apature plate to these lines you should be find with the sound track. Have fun
Posted by Richard Hamilton (Member # 321) on 05-24-2005, 08:26 PM:
Eric,
Is this a new install? What kind of movable masking? Top, bottom, sides? Typically i center the projector without any film or lens in the machine, with the masking set to flat. Then I start with the RP-40 and the flat image. Using the turret adjustments, center the image on the screen. Then switch to scope and do the same. You want both images centered when you switch formats. You dont want to touch the framing knob.
Once both images are centered, then start to cut plates. What I usually do is cut both formats until I have a slight shadow, and then fine tune each one. It would suck to spend a lot of time on one format to make it perfect, and then screw up on the other because you were hacking away with the file to get near the edge!
As Mark said, filing plates is an art. I have seen some masterpieces out there, but also some crap that I would be embarrassed to even hang on my refridgerator! Take your time and when you finish, be proud of your work!
Good luck,
Rick
Posted by Michael Schaffer (Member # 1204) on 05-24-2005, 09:18 PM:
One other factor you have to keep in mind is that a lot of scope lenses are not absolutely centered in themselves. Therefore, starting with the flat (spherical) lens to center the image and then reference the scope centerline to it is a very good practice.
Posted by Mark Gulbrandsen (Member # 72) on 05-24-2005, 09:51 PM:
As a newbie you shouldn't be surprised if it takes you two hours per hole to cut a proper aperature ![[thumbsup]](graemlins/thumbsup.gif) Relax, take your time and have the proper tools at hand before you begin.
Relax, take your time and have the proper tools at hand before you begin.
Mark
Posted by Rick Long (Member # 213) on 05-24-2005, 10:02 PM:
And always remember, it's all in the set-up and alignment of your machine. Don't just slap the scope of flat lens in without tightening the lens-fastening knob. On some projectors, this can change the centering of the image quite a bit.
Check your centering - twice. The last thing you should touch is a file.
Posted by Monte L Fullmer (Member # 2797) on 05-25-2005, 01:04 AM:
..and don't forget the "smile" cut in the aperture plates due to the reversing of the image-especially if you have curved screens.
..then the keystone cuts due to the machine's downward angle.
True, do the RP-40 test first to get machine/turret/lens centered for each format (might have to kick the back of the machine to each side, if necessary), then the centering with the masking tape trick as Mark mentioned (done that many times...)
also, when filing, cut the aperture brass at a taper where the edge facing the film is at a higher edge than the front of the aperture opening.
This gives the picture image a sharper edge with less fuzzy edges to aid in masking so you can have less spillover in the masking area (and helps with flat images on no-masked screens..).
If one can cut an aperture plate like this, there is less than 4 inches of spillover on the dubatine fabric (masking material).
-Monte
Posted by Kris Brunton (Member # 432) on 05-25-2005, 06:40 AM:
I would also make sure your xenon bulb is focused and that you have lots of light on screen.
Nicholson Auger Bit File
I use these types of files. I find them up here at Ackland Grainger but am not sure if you will find them at Griangers in the US?
I would also not advise using the nibbler unless you are cutting a pinhole plate. A little bit on the plate goes a long way on the screen.
Good Luck ![[Smile]](smile.gif)
Posted by Manny Knowles (Member # 1171) on 05-25-2005, 09:16 AM:
Don't use white light. You'll kill your lenses. Use the RP-40 test film (35-PA). Even with the test film running, I keep the dowser closed as much as possible.
Speaking of light -- I have seen people doing plates with house lights up. I can't work like that. I need to have the theatre in darkness, especially if the masking is fixed (i.e. non-moveable).
If you have turrets, make sure that the horizontal AND vertical centres of flat and scope are identical on-screen for each format. I always check this before cutting the plates. There should be no need to adjust framing between formats. RP-40 has a little numerical scale at the top and bottom which will help with vertical framing (and there are also the framelines marked for each aspect ratio.) But don't be too surprised if have to reframe for real movies/trailers -- In my experience, RP-40 test film always frames slightly differently.
If the masking is moveable, I would cut the plate with the masking out of the way and use the test film as the guide.
Posted by Dave Callaghan (Member # 1544) on 05-25-2005, 05:27 PM:
I also use a Nicholson auger bit file.
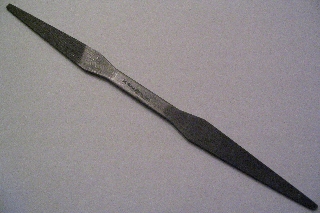
If you have never seen one of these files, at one end the teeth are on the flat and the edges have no teeth. The other end has teeth on the edges and no teeth on the flats. You can fairly easily do squared corners with this file.
I find them locally at a dedicated tool supplier.
Posted by Manny Knowles (Member # 1171) on 05-25-2005, 05:38 PM:
I've always wondered how useful a Dremmel tool would be for filing plates. Anyone tried this?
Also, assuming a theatre has moveable masking (including top), wouldn't it be simpler to get pre-cut plates? Sounds like a no-brainer but there could be a "gotcha!"
Posted by Kris Brunton (Member # 432) on 05-25-2005, 06:01 PM:
I always order the slightly under cut plates. I do have a couple of pinhole plates on hand just in case but have found that the under cut plates will always line up.
I have never used a dremel tool but have to admit I have thought about it. I think that the dremel would turn too fast to be able to control effectivly. I have used it to cut other small items and found that to be frusterating iteslf..
Posted by Rick Long Jr (Member # 541) on 05-25-2005, 06:35 PM:
I use a dremel tool with a christmas-tree shaped bit to rough in the plate, and then a auger file to finish it. Saves a ton of time, but takes practice. You can get a nice bevelled edge.
Posted by Brad Miller (Member # 2) on 05-25-2005, 06:40 PM:
quote: Manny Knowles
Also, assuming a theatre has moveable masking (including top), wouldn't it be simpler to get pre-cut plates? Sounds like a no-brainer but there could be a "gotcha!"
Even a theater with a 0 degree tilt and perfectly centered will have SOME amount of keystoning, thus requiring the edges to be cut ever so slightly curved. That is even more pronounced with curved screens. So no, that is not a good solution.
Posted by Gordon McLeod (Member # 33) on 05-25-2005, 08:27 PM:
Since I always start from a blank plate a dremel is my standard starter with the auger bit file for the rest
Powered by Infopop Corporation
UBB.classicTM
6.3.1.2