This is topic Christie P-35 Rotary Douser Installation in forum Film Handlers' Forum at Film-Tech Forum ARCHIVE.
To visit this topic, use this URL:
https://ft-forum.com/ft/cgi-bin/ubb/ultimatebb.cgi?ubb=get_topic;f=1;t=008844
Posted by Mark Gulbrandsen (Member # 72) on 07-25-2007, 06:33 PM:
Or I should have titled this... How to make your P-35 sound like it can "Kick The Can"!
This design is ok... you might even think as I did that Uncle Rube had a small hand in it's design. The good part is that it will take the heat from large lamps just about indefinately because of its ceramic insert...
The well written instructions with color pictures are nice, however Christie has omitted some of the instructions if you're installing it on older P-35GP's... Cristie is famous for ignoring the older stuff... ![[Eek!]](eek.gif)
![[Big Grin]](biggrin.gif) .
.
The instruction if followed and you have all the tools needed at your disposal should take you about two hours to go through the first time round. They are clear and concise but... They fail to mention that there is no longer room at the top for the fan... so it has to be re-located to the bottom... where they surprisingly are on all new Christies made now. Not a difficult thing to do but not surprising they failed to mention it either. There is also an additional air baffle that needs installing and many machines are not going to have the hole there for this baffle. Christie has omitted accurate layout dimensions for this hole but they actually include a drill jig ![[Smile]](smile.gif) for the hole needed for the manual top rotary shaft. So aside from removing the front panel of the SLC to get at the screws (this part is in the instructons) you also need to remove the front lamp support so you can get the drill in there to make the hole... which is going to be at an angle when you're done unless you own a very squatty right angle drill. In the end all this works out fine and there is little chance of the chsnge-over sticking any longer. Wait.... I still have Three complaints. #1. As fast as the C/O now goes the movement of the dowser is plainly visible on the left side of the screen when its near the end of its travel going open. #2 The projector now sounds like its playing "Kick The Can" and the noise is audible in the auditorium... at least in this theater it was. #3. I pity the tech that has a rivited in place front on his console! The front HAS to be removed to get at some of the Phillips Head screws holding the framing covers in place along the rear. These poor souls may have to remove the entire head from the console just to install this dowser.
for the hole needed for the manual top rotary shaft. So aside from removing the front panel of the SLC to get at the screws (this part is in the instructons) you also need to remove the front lamp support so you can get the drill in there to make the hole... which is going to be at an angle when you're done unless you own a very squatty right angle drill. In the end all this works out fine and there is little chance of the chsnge-over sticking any longer. Wait.... I still have Three complaints. #1. As fast as the C/O now goes the movement of the dowser is plainly visible on the left side of the screen when its near the end of its travel going open. #2 The projector now sounds like its playing "Kick The Can" and the noise is audible in the auditorium... at least in this theater it was. #3. I pity the tech that has a rivited in place front on his console! The front HAS to be removed to get at some of the Phillips Head screws holding the framing covers in place along the rear. These poor souls may have to remove the entire head from the console just to install this dowser.
What a hoot!
Mark
Posted by Paul Konen (Member # 41) on 07-25-2007, 09:07 PM:
Great! There are 23 to do at my place. 1 projector has been transferred to another theatre.
I know that looking at the instructions myself seem quite thorough but boy.
I still like Brad's idea that the start cue strike the lamp. No need for a douser then.
Posted by Mark Gulbrandsen (Member # 72) on 07-25-2007, 10:08 PM:
quote: Paul Konen
I still like Brad's idea that the start cue strike the lamp. No need for a douser then.
Thats all and well assuming that your customer doesn't run his lamps to 22,368.7 hours and the lamp strikes on the first try and comes up stable right away.
This dowser works really well and is certainly unique but if you set up an assembly line of sorts after the first one it shouldn't be too bad... a couple of days work for a couple of techs. And when you're done... all that clang'n and bang'n when they open and close.... Make no mistake! You hear it when the film goes on screen and then comes off screen ![[Roll Eyes]](rolleyes.gif) .
.
Add more time... another half hour to 45 min. if you have to move the fan to down below and drill the hole for the baffle.
Mark
Posted by Brad Miller (Member # 2) on 07-25-2007, 10:47 PM:
quote: Mark Gulbrandsen
Thats all and well assuming that your customer doesn't run his lamps to 22,368.7 hours and the lamp strikes on the first try and comes up stable right away.
It's called opaque black leader, Mark. You have the lamp strike on the black leader and then set up your cueing system from there, whether it be 8 seconds later or a minute via a start cue. Removing the douser takes that aspect of failure completely out of the chain. They simply are not needed on platter installations.
Posted by Tristan Lane (Member # 1169) on 07-25-2007, 10:59 PM:
quote: Mark Gulbrandsen
I pity the tech that has a rivited in place front on his console! The front HAS to be removed to get at some of the Phillips Head screws holding the framing covers in place along the rear.
I've done a lot of these conversions, and on the P35GPS projector where hex head screws were used, a ball head wrench will just barely work the screw out. You may flex the snood a little bit in the process, but it will work. I only removed front panel on the first one I did. My thoughts are, of you are going to end up drilling out all the rivets, you might as well just drill one access hole in the snood lip instead to get access to that one screw.
I'd assume that the old projectors with the phillips screws will require the removal of the front panel, but as far as I know, the majority of SLC consoles have screws on the front panels, and the newer SLC consoles have screws securing the snood.
It is a PITA on the older stuff, but the benefits of the new douser will save countless hours of labor in the future maintaining the original c/o dousers.
And I agree, the ceramic piece makes the douser pretty much impervious to heat.
Posted by Monte L Fullmer (Member # 2797) on 07-26-2007, 01:17 AM:
quote: Paul Konen
I still like Brad's idea that the start cue strike the lamp.
...like those small Chinese portable 35mm units - no dowser and just stikes up when the "RUN" button is hit.
Sounds like a good procedure...but, sadly, not in a "booth monkey" operation...to much for them to remember how to work with it.
Posted by Brad Miller (Member # 2) on 07-26-2007, 03:05 AM:
What are you smoking Monte? It is even BETTER for booth monkeys to deal with because it is one less thing to go wrong! On most automations, the exciter relay isn't latched until the douser would open. You simply move the two wires from the xenon relay over to the exciter relay on the automation and that's it.
Posted by Monte L Fullmer (Member # 2797) on 07-26-2007, 05:32 AM:
Oh do agree with you Brad on doing the mod and the leader thing, but just can see that procedure being kept in force from trainer, to trainer, to trainer ..etc..
Sorry for being a bit negative on this topic, but been around too many booth monkeys who doesn't care about presentations and with me caring isn't one of their concerns...and I can't enforce it what I'm coming from since the mgrs doesn't care much either...rather depressing situation at times, if you ask me.
Posted by Paul Konen (Member # 41) on 07-26-2007, 08:49 AM:
Mainly because of the older douser issue, I have trained my staff to close the hand douser until the black leader is in the film gate and then they open it. I start the projector during the middle of the preshow freeze frame and don't want white light through clear leader showing up on screen.
Posted by Mark Gulbrandsen (Member # 72) on 07-26-2007, 09:08 AM:
Brad,
quote: Brad Miller
It's called opaque black leader, Mark. You have the lamp strike on the black leader and then set up your cueing system from there, whether it be 8 seconds later or a minute via a start cue. Removing the douser takes that aspect of failure completely out of the chain. They simply are not needed on platter installations.
Well, the cue for me is having to set up the cues. Thats not going to happen with booth monkeys so try again...
You need to work in the real world for a while... where you have 700 customers with 500 dfferent ideas of how it should be done and ultimately 300 booth monkeys operating... most of em new! Its fun, its challenging, and you make a ton of money. The C/O is a tool that no one needs even know is there and it works without cue tape. Ultimately its the customers decision how its done and they are always right ya know.
quote: Tristan Lane
I'd assume that the old projectors with the phillips screws will require the removal of the front panel, but as far as I know, the majority of SLC consoles have screws on the front panels, and the newer SLC consoles have screws securing the snood.
If they weren't so dam tight a right angle screw driver would be possible... but they're too tight. Removing the front cover isn't a real big deal an on SLC. The people likely to have problems would be those that have CH consoles or Strong. Most of those are rivited in place. I have P-35GP's that go back to when they first came out and some P-35C's that had the goofy idler for the intermittent drive that I converted over to the GP model (the factory said it couldn't be done...ha, in reality it takes less than 3 hours to do.)
Mark
Posted by John Hawkinson (Member # 1135) on 07-26-2007, 05:25 PM:
I don't know if this is really relevant, but recently I was in right-angle screwdriver hell, and I ran across these at Sears:
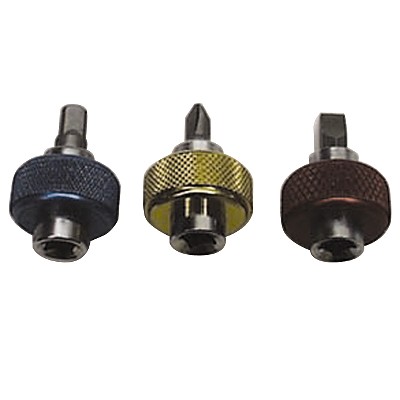
"Finger Bit Drivers," Craftsman #41390. Seem to work decently, and you can drive them with a 1/4" ratchet. For scale, the knurl is a 1" diameter.
--jhawk
Posted by Monte L Fullmer (Member # 2797) on 07-26-2007, 06:35 PM:
Yea, got a set of them in my toolbag that I bought at Sears back in 2002 ... Best little tools to have in the bag when it comes to tight corners. That enlarged knurl area really helps on the turning torque in tight places.
Along what's handy is that the bit is magnetially held in the socket for the usage of interchangeable 1/4" bits of any size, length, tip, et.al.
Even on a 1/4" socket wrench where if you can't rotate the wrench, the knurl does that for you while you're pushing down on the wrench for stubborn nut or bolt.
Yes, a must for every tekkie out there and not expensive at all. - Monte
Posted by Thomas Pitt (Member # 4322) on 07-27-2007, 03:10 AM:
What usually happens in Vue Leeds Light is the projectionist (or timer) starts the show; and the douser opens at that time. As soon as the film is up to speed, the lamp strikes. If they've put the film in the right place, the lamp should strike just as the first advert is about to start, so none of the leader is projected.
Often the lamp doesn't strike immediately, so you get the sound from the advert shortly before the picture appears. At the end of a showing, however, it's a little different. The final cue closes the douser, resets the lens turret and masking to flat (if it was a scope feature), puts lights up, and switches the sound back to non-sync. The film then tails out through the projector, but the lamp doesn't switch off until it has gone out of the projector completely. Is there any reason for this?
In Vue Sheffield, on the other hand, the lamp strikes as soon as the start button is pressed. When the film is up to speed and the lights have gone down, the douser opens to display the first advert. For some reason, this causes a tiny glitch in the non-sync sound - it briefly cuts off, then comes back on and fades down slowly, before switching over to the film sound.
Posted by Paul Konen (Member # 41) on 08-11-2007, 01:45 AM:
Got three done tonight. I'm drilling the hole for the new handle from the top. I went around on one side of the complex and marked the location of the hole. (Trying to do as much prep work as possible).
So, one of them I can't get the knob on. Have to drill that one out. Also, the kicker, douser, whatever you call it wouldn't swing all the way closed. Had to make an adjustment. Hope more aren't like that.
You probably WILL have to swap the black / gray wires to make it work correctly.
Beware of the creme colored solenoids. The inner diameter seems to be a touch smaller than the blue solenoids.
Takes about 35-40 minutes to do. Helps to remove as much as you can during credits so you have time to get it all done.
I'll supply some pics if I can.
Posted by Mark Gulbrandsen (Member # 72) on 08-11-2007, 09:25 AM:
Paul,
Did you pull the fronts off the consoles or get the little screwdrivers at Sears? I agree on the solonoids! If the creame ones are present I always replace them with one that has more armature clearance. Yes you do have to reverse the wires since the action is the opposite of the old system.
Mark
Posted by Paul Konen (Member # 41) on 08-12-2007, 12:21 AM:
So I worked on a couple more today, but an stopping pending advise from my engineer. All of the solenoids that I have are the creme colored ones with the clear circuit board. I was lucky to have a couple actually fire correctly, but others just didn't have the mustard to fire to cause the movement to fully swing open. I had a couple of replacement solenoid units that worked wonderfully. It doesn't seem like the rod binds on the old solenoids, they just fire slower or something. Don't know. I don't want to do any others until I have better solenoid assys.
They take about 30-45 minutes to put in once you get the hang of it.
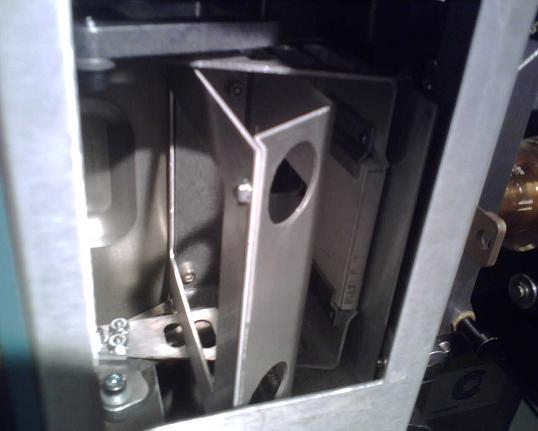
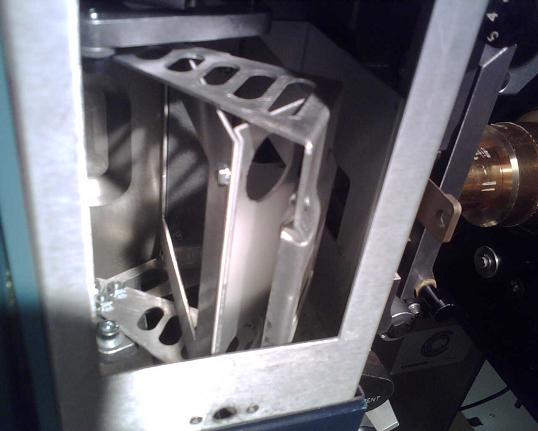
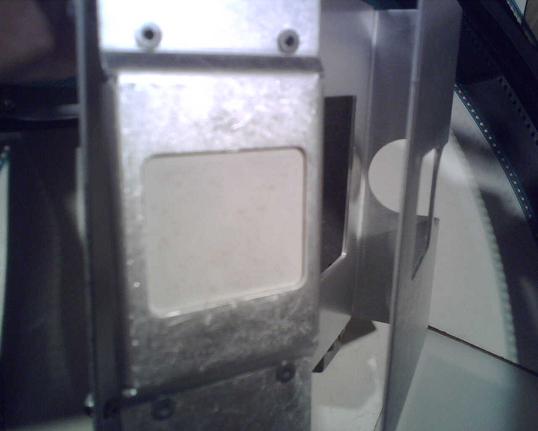
Here are a couple of pics of the device.
Installed in closed position
Installed in the open position
Outside the unit looking at the ceramic (?) douser.
Mark, I didn't pull the front panels off at all. I am able to move the snood out of the way just enough to get that one allen screw off that releases the top shroud. It is hard to get those back allens off when you are dealing with an SLC-30. Not much space to get meaty fingers in and handle a 7/32 or similar to remove 2 more allen screws.
Posted by Mark Gulbrandsen (Member # 72) on 08-12-2007, 08:45 AM:
Its good that you had allen screws!! I had an older machine with philips scrrews.
The problem is not really with the creame colored solonoids themselves but with folks operating the equipment that hold the C/O button on for too long a period. Granted the old C/O shutters would bind and such but holding the manual button down longer isn't going to make it open or close. What it does is to heat up and damage the coils making them seem weak. All of the coils in use have one major fault and that is that the bobbin they are wound on has a plastic stator. If the plastic gets too hot they warp, thats when the rod sticks. I've removed both types of solonoids that have been damaged by careless operators this way. Christie would have been even further ahead had they gone to a rotary solonoid along with the rotary douser. It could have been mounted right below the douser mechanism itself. Almost all automations will accomodate a hold type C/O.
Also, are you able to see the shadow of the douser opening very briefly on the left side of the screen... when the douser is near its full open position? As fast as it moves I could and I don't think these new dousers would work too favorably in a C/O house.
Mark
Posted by Paul Konen (Member # 41) on 08-12-2007, 11:35 AM:
I didn't see any "fogging" of the image on the left side. It seems to clear the light path totally.
Also, thanks for the explanation about the solenoid issue. It does explain why some are probably worse off than other ones. You also cleared up the issue with the screw in that they used phillips, then converted to allen at some point.
Posted by Mark Gulbrandsen (Member # 72) on 08-12-2007, 11:52 AM:
It wasn't a fogging issue that I noticed, they doi completely clear the light path... just that you can see the shadow of the dowser move out of the way on the left side of the screen. This is when the dowser is almost at its fully open travel. Run white light on the screen and do a few open/closes and I think you'll see the same thing I am seeing.
Mark
Posted by Paul Konen (Member # 41) on 08-12-2007, 11:55 AM:
Ok.
Posted by Darryl Spicer (Member # 711) on 08-12-2007, 12:19 PM:
quote:
It wasn't a fogging issue that I noticed, they do completely clear the light path... just that you can see the shadow of the dowser move out of the way on the left side of the screen. This is when the dowser is almost at its fully open travel. Run white light on the screen and do a few open/closes and I think you'll see the same thing I am seeing.
I have seen this before, especially if it is a bright scene that it opens on. We don't use the green bands so it is not as noticeable if the bands were used. I have also noticed the dowser bounce on the Christie cp2000 digital projector, since it is a free falling dowser when it opens. you can even hear it bounce.
Posted by Paul Konen (Member # 41) on 08-12-2007, 01:55 PM:
Darryl, how soon before the first trailer do you command the douser to open? Yes, it is someone noisy when it opens, but I haven't seen the bounce as I open well before the first trailer hits.
Posted by Darryl Spicer (Member # 711) on 08-12-2007, 02:37 PM:
Paul,
After noticing that early on I reset things up so that the douser opens before any image hits the screen. I have it timed for scope so that it is open with an extra 5 seconds of black and I have the delay set on the DCA-21 automation so that the masking comes all the way down and the pre-show cuts off and picture hits the screen all in one smooth stroke.
Posted by Mark Gulbrandsen (Member # 72) on 08-12-2007, 06:45 PM:
Daryl,
I did a similar thing where I installed just one. That works fine for a single projector but I'd like to see a pair of these in action in a two projector booth. I think the C/O would be very obvious.
Mark
Posted by Carey Barber (Member # 1586) on 08-13-2007, 04:46 PM:
Regarding the fan on top of the projector...
For some reason, my larger houses have the larger "squirrel cage" type fan underneath while my smaller houses have the smaller muffin fans on top.
So, installing the new dowser in the larger houses is a simpler task.
Here's the question --- Is it possible to move the smaller muffin fan to the bottom of the projector, or do you have to install the larger impeller style fans?
I would hate to have to order new fans to go along with these new dowsers.
Posted by Paul Konen (Member # 41) on 08-14-2007, 09:59 AM:
Carey, my SLC-30's have the muffin fan under the analog sound head. You may have to see if there are mounting holes and if the power cord can reach. They run continuously.
The SLC-40's have the cage fan that you refer to and only run while the projector is in operation.
Posted by Carey Barber (Member # 1586) on 08-14-2007, 03:11 PM:
Paul,
That's funny...My small houses have the muffin fan on top rather than the bottom.
But, it sounds like that smaller muffin fan will fit underneath and that's what I really needed to know.
Thanks...
Posted by Mark Gulbrandsen (Member # 72) on 08-14-2007, 04:16 PM:
Ya have to move the muffin fan to the bottom of the projector. I had to drill holes in the bottom of machine I did to mount it. Can't say if later machines already have holes or not....
Mark
Powered by Infopop Corporation
UBB.classicTM
6.3.1.2