This is topic New Studio Movie Grill Pictures in forum Film Handlers' Forum at Film-Tech Forum ARCHIVE.
To visit this topic, use this URL:
https://ft-forum.com/ft/cgi-bin/ubb/ultimatebb.cgi?ubb=get_topic;f=1;t=009105
Posted by Sean McKinnon (Member # 612) on 02-07-2008, 02:07 PM:
Wow! Brad, Wow! That looks like a phenominal job there. I love the platter array, I think that is the greatest thing I have ever seen. It looks like you guys did a really great job there! The only thing I do not like so much is the sound racks attatched to the back of the consoles, but thats not a huge deal. Also, maybe I am blind but I did not see media cleaners for the Film-Guard, I know I must have just missed them? This theatre and booth look awesome, I would love to have the chance to operate a platter array someday. I am sure that this will be a booth where film will be done right! Keep up the good work!
Posted by Thomas Dieter (Member # 2507) on 02-07-2008, 02:45 PM:
I have to agree, I love the layout, and it looks like an awesome theatre.
quote: Sean McKinnon
Also, maybe I am blind but I did not see media cleaners for the Film-Guard
If you look at all the pictures that have a platter in them, you can see the bracket for the cleaners.
Posted by Monte L Fullmer (Member # 2797) on 02-07-2008, 07:27 PM:
quote: Thomas Dieter
platter in them, you can see the bracket for the cleaners.
....What I love about the AW3r units having that available bracket mount on the tower - which you can't really do on any other make of platter units.
Plus with the film tension right there, you know that the prints will be wiped completely with FG.
Posted by Mark Gulbrandsen (Member # 72) on 02-07-2008, 08:00 PM:
Brad,
Nice job on the booth!!! Do the P-35's have the new round tooth plastic pulleys in them???
Mark
Posted by Ron Funderburg (Member # 4561) on 02-07-2008, 08:23 PM:
Great looking diner theater! Very nice and the booth is very, very nice! I'm oh so jealous !!!
Posted by Mike Olpin (Member # 1115) on 02-07-2008, 08:25 PM:
Very well done!
I'm surprised by the use of the piggy-back style racks on the SLC consoles. Was this because of space considerations, or was there another reason?
Posted by Monte L Fullmer (Member # 2797) on 02-07-2008, 09:14 PM:
(I've posted this pict before)
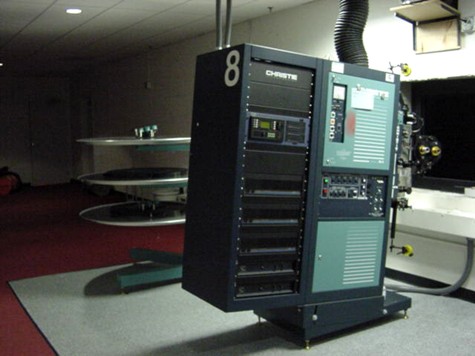
At EDWARDS, the choice of the piggyback rack (being a Christie option that I do believe was instigated by the EDW's engineering department) was for tech and user simplicity-having all the controls and components needed in a basic all-in-one area. Also, it's simple logistic to have your input runs as short as possible to the processor.
Plus, it made the wiring from reader to rack and wiring from console to speakers a lot easier to run.
As you notice in the pict, the speaker wiring conduits are coming from the top of the rack over to the "J" box on the wall behind the machine mounted on the wall (which hidden in view), thus only the one high voltage line is the only conduit entering in the front of the toe kick of the console. This arrangement makes for a very clean looking booth.
What I noticed in these picts is of the three conduits coming out of the toe kick in Brad's installation (which I also do congrats on a superior install! ![[thumbsup]](graemlins/thumbsup.gif) ), but wondering - is the low voltage for speaker output going in the same gutter as the high voltage coming into the console, or is there a special arrangement in that gutter to separate the two voltages?
), but wondering - is the low voltage for speaker output going in the same gutter as the high voltage coming into the console, or is there a special arrangement in that gutter to separate the two voltages?
Posted by Mike Olpin (Member # 1115) on 02-07-2008, 10:25 PM:
Yeah, I had a booth full of them back when I was at Edwards. The reason I'm surprised at there use is because it makes it difficult to get at the rear lamphouse assembly if you have to service it. Additionally, it creates a loud buzz in the auditorium as the lamp is struck. I don't see a stack of amps in the rack, so that may not be a problem here.
That picture makes me homesick for my first booth. :-)
(Rancho San Diego 15)
Posted by Steve Guttag (Member # 268) on 02-07-2008, 11:09 PM:
Monte...you didn't look close enough...what speaker outputs (that are not low-voltage anyway). It appears that Brad is using Cobranet to send the signals down to amps mounted behind the screen (QSC Basis systems run on Cobranet).
Steve
Posted by Joe Redifer (Member # 3) on 02-07-2008, 11:27 PM:
Nice booth, but nowhere near as cool as the last one. What happened to the Kinotons? I also am not too fond of sound equipment attached to the lamphouse. It looks pregnant or infected, but oh well... somehow I will survive.
Posted by Monte L Fullmer (Member # 2797) on 02-07-2008, 11:32 PM:
Thx Steve for that info. Being stuck around with 25 yr old equipment and no improvements or modifications in sight, really puts me back a generation there.
Yea, Mike - I forgot about that with the bulb assembly thing. At one EDW's I worked at, we did have to change out the rear bulb mechanism that had a piggyback rack attached. Luckilly, it wasn't that all too difficult since the bulk of the replacement was on the front, but still needed that extra hand going through the rack for aid. Also, we didn't have (and I'm sure you didn't have at the 15plex) auto focus controls for the bulb.
Posted by Brad Miller (Member # 2) on 02-07-2008, 11:45 PM:
Thank you for the comments. There are enough cleaners, plus a spare, for every auditorium. We mount them to the platters. They can't all be seen as prints were moving around and the most obvious platters were only taking up film.
Mark, I think these were the final projectors manufactured with the old school belts. Regardless they perform excellent and when belt changing time comes I will install the kits.
The piggy-back racks were decided upon due to convenience in wiring and servicing. At other locations (such as SMG Arlington) I had a wireway installed under the slab to pull wires between the console and the rack. This install was supposed to have two gutters on the wall, but the blueprints got screwed up, so we had to go for routing power lines through one piece of dedicated sealtite and briefly share the wireway (which I was not too thrilled about). It didn't affect anything in the end except there is some light noise in the BluRay player's video signal (which we will fix), as the sound system is QSC Basis and the audio is transferred digitally over ethernet cables to the racks behind the screen. The sound systems are dead silent with no discernable noise, and no the lamps cannot be heard in the auditoriums when they strike.
This was also Dan Lyons' first multiplex install to be a part of.
Posted by Scott Norwood (Member # 30) on 02-08-2008, 06:54 AM:
Agreed with the others--it looks like a very nice installation. I don't persomally like the huge port windows, but they are probably necessary in that type of venue for special shows, events, etc.
Is the use of cobranet done just to simplify wiring and installation, or does it offer some other benefit over running regular balanced lines to the amps?
Posted by Joshua Waaland (Member # 287) on 02-08-2008, 06:57 AM:
What brand of monitors did you use and where did you get them? I rarely see this kind of rackmount monitor. Most are pull out and flip down type for server racks.
Is that Calink software for the CA21's that is running on the monitors?
[ 02-08-2008, 07:59 AM: Message edited by: Joshua Waaland ]
Posted by Mark Gulbrandsen (Member # 72) on 02-08-2008, 10:09 AM:
I'm surprised you didn't get the new pulleys on them... At least its a very inexpensive upgrade to do when needed. It does lower flutter drastically which will also greatly improve the operation of the SRD basement reader.
We've looked at doing the Basis/Cobranet for several customers and it really jacks up the price of the system/plex. You need the expensive box at both ends... At this point in time D-Cinema is a much higher priority in the minds of most of those customers. The cost of twisted copper speaker runs in conduit is still actually quite a bit less expensive than just one of the Basis Boxes. I do like the whole Basis idea though, its very sound and very reliable. It also allows you to lock up the amps back stage... a very important plus in places like Detroit and Chicago!
Joshua, Dell and others make those type of flip out monitors... very common item in the IT world. Again... very expensive to implement. Used ones are available on E-bay are still in the $500.00 range.
Mark
Posted by Joshua Waaland (Member # 287) on 02-08-2008, 10:49 AM:
Mark,
I thought the monitor in the photo was a flush mount that was bolted into the rack. I don't like the ones that are on rails and flip out. I had one of those 15" Compaq flip out monitors but couldn't get it to work in my rack. I use two post relay racks because of my limited space and those need four posts to support the rails.
Brad,
Nice job on that install. It must be nice to work with a customer that isn't afraid to drop some dough on nice equipment.
Posted by Brad Miller (Member # 2) on 02-08-2008, 12:22 PM:
Those are Polaroid lcd monitors from Wal-Mart. They are inexpensive and have a VGA input for the CALink monitor screen AND various other video inputs. As a result, this monitor, although not great in quality (but that doesn't matter for it's purpose) provides the status panel timeline and can be switched over to provide a preview monitor for the video projector when running events.
Peizen will make a kit for any rackmount monitor you need. They are fast, fair on prices and do good work.
The Basis/Cobranet system IS cheaper than running speaker lines into the booth. It's not just the cost of wire involved, but also the LABOR that you have to add up. Plus there are a bunch of benefits and options available for tuning, making custom formats and such. It's got a bit of a learning curve, but once you get past the first setup it's pretty sweet.
Posted by Bobby Henderson (Member # 840) on 02-08-2008, 02:37 PM:
That's the coolest renovation of an old grocery store building I've ever seen.
Posted by Chad M Calpito (Member # 3736) on 02-08-2008, 03:27 PM:
Hey, Brad, all I can say is WOW! That is one hell of a nice booth. I, too, love the platter array set up. I am very jealous. The Piggyback soundracks are awesome too. Keep up the awesome job, Brad. ![[Big Grin]](biggrin.gif)
Posted by Brad Allen (Member # 470) on 02-08-2008, 03:30 PM:
Brad, outstanding job on that install. Excellent indeed!
Posted by Tim Asten (Member # 4051) on 02-08-2008, 06:27 PM:
Nice clean looking install, lovely projection room. I can't see any digital projectors, so I assume SMG still think there is a future with film (Comforting for us worried about our jobs) ![[Smile]](smile.gif) . The CobraNet system looks great if you require flexable amp positioning. Personally I like amps where I can see 'em in case they go wrong and need replacing, which they do in our cinema quite often - lost two this week do to Cloverfield Meltdown Syndrome. Not sure about the platter array though, It must be a nightmare if you get a brain wrap or something. I take it that the AW3's work independently of the projectors? Our Kinoton ST200's feed platters need a constant motor run signal from the source machine to run smoothly, so I guess the platter arrays would not be practical for Kinotons.. Tim.
. The CobraNet system looks great if you require flexable amp positioning. Personally I like amps where I can see 'em in case they go wrong and need replacing, which they do in our cinema quite often - lost two this week do to Cloverfield Meltdown Syndrome. Not sure about the platter array though, It must be a nightmare if you get a brain wrap or something. I take it that the AW3's work independently of the projectors? Our Kinoton ST200's feed platters need a constant motor run signal from the source machine to run smoothly, so I guess the platter arrays would not be practical for Kinotons.. Tim.
Posted by Tim Reed (Member # 137) on 02-08-2008, 10:39 PM:
quote: Mark Gulbrandsen
It does lower flutter drastically
Changing the pulleys out does that anyway.
Posted by Chris Slycord (Member # 4239) on 02-08-2008, 10:57 PM:
quote: Tim Asten
It must be a nightmare if you get a brain wrap or something.
I remember him saying a while back that his setup (referring to a previous theater with an array) simply does not have brain wraps (and he designed the ceiling roller setup in such a way to not cause damage in the case of one).
Posted by Mark Gulbrandsen (Member # 72) on 02-08-2008, 11:17 PM:
quote: Tim Reed
Changing the pulleys out does that anyway.
Tim,
If you have very worn alumnium pulleys installing new alumnium pullleys might lower it a tad but it won't lower it very much... even with careful belt tensioning there exists a belt pitch difference on the double sided belt!! Its different on the inside than it is on the outside... the pulleys are not machined for this difference and the end result is that the belt teeth pick away at the pulleys when they are going onto and comming off a groove. If you pinch the davis tight loop arms together you can actually feel it. There is a huge difference between using round tooth pulleys and square tooth pulleys. Strong went thorugh similar problems in the 5-Star. Christie first used round tooth pulleys on the Cine X-35. We installed our first batch of them close to 4 years ago now. It was obvious from the get go that the flutter problem didn't exist in that machine and the basement readers tracked with very low numbers. The new belt kit for the P-35 offers the same low flutter aspect as one of the benefits. Also almost zero belt shedding with the plastic pulleys since they are self lubricating. The belts in those Cine X-35's from 4 years ago are all still the originals and show no wear! The shutter belt is also now round tooth and quite a bit heavier duty. I don't know if you've ever worked with the early garbox variety P-35... the one with the noisy reversing gear on the movement... those early machines did not have the P-35GPS flutter problem because there was no double sided belt.
Mark
Posted by Floyd Justin Newton (Member # 1316) on 02-09-2008, 10:30 AM:
Brad--
Beautiful install!
Posted by Michael Schaffer (Member # 1204) on 02-09-2008, 01:47 PM:
Nice work, Mr M. Did you do all the other SMG locations as well?
I know this has been discussed before but could somebody quickly sum up for me again what the logic is behind having the platters in one central location with all those long threading paths? I know this has been discussed before (well, almost anything has, I guess) but I am too lazy right now to do a search (oh yes, that's sooo much work).
quote:
You can't see it, but there are even SMG logos on the sconce lights. That's branding working overtime for ya!
Are they cut out templates projecting the logos on the faces of the guests?
Why are the automations in the sound racks, not in the space designated for them in the consoles?
It's interesting to see the QSC network used in a movie theater. That way you have more space in the racks and central monitoring and diagnotics functions, although I am not entirely convinced all that makes too much sense in a (more or less) conventional movie theater. Pretty elaborate setup overall with a lot of nice equipment features although at the end, they did cut corners in the wrong places with the projector heads.
Posted by Daryl C. W. O'Shea (Member # 1303) on 02-09-2008, 08:16 PM:
Why 3x ProCurve 1800-8G (which are rack mountable in pairs with HP part #5183-7210) rather than 1x ProCurve 1800-24G (which comes with mounting ears and is 20% cheaper before you even buy mounting gear for the -8Gs)?
Posted by Brad Miller (Member # 2) on 02-09-2008, 08:21 PM:
The older theaters have had different people servicing them and originally SMG bought only used equipment. I installed the new builds and the equipment was purchased new, so there are no surprises.
I personally prefer the setup at Royal with a platter beside each projector. Some of the SMG projectionists prefer them all lined up in a row, as it makes it easier to monitor all of them at once despite the longer threading paths. Both ways work fine and have their pros and cons vs. the other. There was not room in this booth to put them all in a row, so that was the deciding factor on the platter array layout.
quote: Michael Schaffer
Are they cut out templates projecting the logos on the faces of the guests?
I almost made a joke to the owners one time about making a looping DVD with that logo spinning that we could project onto the lower right corner of the screen during the movie and then I quickly shut my mouth. I predict your idea of the logo on the patron's faces will follow logos carved into the urinals.
The automations are easier to work with in the racks on a day to day basis, as they are higher. They are also easier serviced in the rack. The pictures don't show it, but locking panels are going over the automations this week using 4 different type of security screws to prevent idiots/morons/fucktards/etc from pressing the buttons when they shouldn't be. Only the projectionists have keys to unlock the panel.
You should check out the current line of heads Christie is putting out. I know it is hard to believe, but these heads are every bit as steady as the PK60D. Although I love the Kinotons, the Christies do have some benefits as well that affect the final image such as more control over the precise alignment and focus calibration of the image the way their turret is designed, and their apertures permit a much sharper edge to be cut (the aperture shadows are thinner). Plus they don't have that side to side play in the aperture like the turreted Kinotons do. That being said I still LOVE the Kinotons with their other advantages, but at half the price, the Christie is the winner.
quote: Daryl C. W. O'Shea
Why 3x ProCurve 1800-8G (which are rack mountable in pairs with HP part #5183-7210) rather than 1x ProCurve 1800-24G (which comes with mounting ears and is 20% cheaper before you even buy mounting gear for the -8Gs)?
The building has a spare 8G in the event of a failure. It is cheaper to buy an 8G to sit on the shelf as opposed to a 24G.
Posted by Brad Miller (Member # 2) on 02-09-2008, 09:01 PM:
Before anyone starts asking what I mean about the Christie turrets being superior to the Kinotons, here is a basic outline of a setup routine on the Christies. (Kinoton turrets simply do not have all of these controls. They have a clumsy "loosen 4 screws, jiggle the lens around and then retighten them" solution which is not very precise and does not permit fine tuning the side to side and top to bottom focus across the image.)
De-focus the bulb a bit.
Remove the flat lens and align console to center the reflector spot on screen.
Re-align reflector if you don't get a perfectly round spot with even dark circles around it (if new from the factory, Christie does a darned good job of aligning things).
Run loop in flat and physically level the projector. Be sure to verify it is level by racking the framing a bit so you are checking the top and the bottom. Assuming the projector has a downward tilt, remember the top of the image will be closer to level than the bottom.
Set eccentric so the image is as far left (if the right projector) as possible on both lenses. (This is for dual projector or installations such as SMG where the projector is offset due to the dual port windows. Most often you will want near the maximum amount the turret offers, but not always. This has always been a good place to start for me.)
Level scope lens by eye and set astigmatism through the lens with binoculars. (This should be done by throwing the astigmatism setting on the anamorphic as far off as you can so the picture is horribly blurry. At this point adjust the focus control on the projector and look through the binoculars to obtain perfect sharp horizontal lines. Concentrate on the thinnest lines the lens can resolve. Then without touching the projector's focus control again, adjust the astigmatism control on the lens so that any chromatic abberation is minimized and the vertical lines are as sharp as possible. Always use the binoculars for this entire step. Lock the astigmatism adjustment.)
Using binoculars, adjust for perfect side to side focus using the turret stop on scope.
Using binoculars, adjust for perfect side to side focus using the turret stop on flat. If you should come across a difference between the formats, make a note of how far you have to turn the allen wrench from the optimum setting for the scope lens and split the difference on the turret stop adjustment.
Bump the console to center the image on the screen if needed. Obtaining perfect focus across the image is most important.
At this point use the binoculars again to verify you are maintaining perfect top to bottom focus. If not, you will need to adjust the gate stop slightly until you obtain this. Having perfect focus in all 4 corners at the same time is imperative before you file the apertures.
Run a loop to verify your level again. Often booth floors are not level and if you should have to bump the console even half an inch you could throw off the level of the projected image on the screen. Make any necessary adjustments viewing through the flat lens, then switch to scope and re-level the lens if it looks off.
Run a pillarboxed scope trailer of something bright and verify the pillars appear to be parallel to the side masking. (This is most important in a changeover install, as the more of a downward tilt you have, the more slanted the scope image may suddenly appear with actual content running through it.) Re-level the scope lens and re-compare with PA35. At this point it becomes a judgment call if you can't get both to look level and squared off to the masking. Don't forget you also have the eccentric adjustment that may come into play on this step. If you need to adjust it to get things right, you will need to repeat the last however many steps.
At this point I always re-check the astigmatism on the anamorphic using binoculars.
Use the eccentric to center the flat lens horizontally. (If this is a 2 projector install do NOT rely on a piece of tape on the screen as your "centerline". Fact of the matter is any offset of the projector will end up with you cropping part of the image unnecessarily when compared to the other machine. Use the arrows and squares to center the image from the outer 0.825 line and save your tape.)
Put the aperture in and center the turret's vertical stop in scope to make the aperture edge fit within the masking.
Remove the aperture and frame the projector for perfect vertical framing using the projector's framing control.
Switch to the flat lens and adjust the turret's flat vertical stop for perfect vertical framing. Do not touch the projector's framing control during this step. The framing should remain perfectly centered between the formats WITHOUT touching the framing knob.
Switch turret and masking back and forth half a dozen times as well as opening and closing the turret to ensure that the settings hold accurately.
Reinsert the aperture and verify that with both lenses the undercut aperture fits within the boundaries of the masking. If not, go over the last few steps.
File the apertures. Angled cuts with the "pointed edge" on the screen side of the aperture will make for a sharper final aperture and permit you to obtain square corners as opposed to corners that are slightly rounded.
Focus the bulb for optimum alignment and go eat some yummy cheesecake.
I may have missed something in there, but I think that covers it. It's worth it to spend the extra time on the initial setup because things cannot be realigned after the apertures are cut without having to re-cut them, and the alignment of the equipment will affect the quality of EVERY SHOW the theater runs in that auditorium until somebody gets in there and sets it up right.
Posted by Phil Hill (Member # 371) on 02-09-2008, 11:21 PM:
Nice install as usual, Brad! Congrats to you and Danny! (Where's the install team pic? HUH!)
Question: Are the line-level audio signals carried via cat5 to the behind-the-screen amps? If so, which QSC xmtr and rcvr is necessary to accomplish (only) this function and about how many $? If not too expensive, sounds like a good solution for my screening room instead of balanced line-level audio lines.
Posted by Brad Miller (Member # 2) on 02-10-2008, 01:30 PM:
Your runs are so short you are better to put the amps in the booth and run traditional speaker wire.
Posted by Marco Giustini (Member # 4544) on 02-11-2008, 06:42 AM:
Hi Brad
Intresting job.
I'm puzzled about your very detailed description of the setup (very professional, congratulations).
Do you mean that lens shift on turrets can change the focus on the screen? I thought that lens shift is only to correct geometry.
Are we talking about the same lens shift? I know the one that is available on Cinemeccanica's turrets.
I'm also used to the one found on the Home Projectors, I didn't know it's mean for focus adjustments. I know that to change focus you have to slightly rotate the lenses, not just shift them.
Am I wrong?
Ciao!
Marco
Posted by Brad Miller (Member # 2) on 02-11-2008, 12:51 PM:
The eccentric will help adjust for keystoning. The turret stop (how far the turret closes) will help adjust for side to side focus, just like how the gate stop will adjust for top to bottom focus. Cinemeccannica's turret and gate design is not that flexible.
Posted by Marco Giustini (Member # 4544) on 02-11-2008, 02:22 PM:
So I was right, thanks Brad.
It's a great improvement. It's like CRT projectors, where you change lenses' angles to achieve correct focus on the entire image.
So Christie's gates can be angled vertically to achieve the best focus through the screen... This is missed on Cinemeccanicas. I can only set the stop of the turret (horizontally), nothing on gate.
Thanks for your explanation Brad
Marco
Powered by Infopop Corporation
UBB.classicTM
6.3.1.2