This is topic Barco DP2K-23B lamp change in forum Digital Cinema Forum at Film-Tech Forum ARCHIVE.
To visit this topic, use this URL:
https://ft-forum.com/ft/cgi-bin/ubb/ultimatebb.cgi?ubb=get_topic;f=16;t=002696
Posted by Jesse Crooks (Member # 9389) on 05-25-2016, 05:12 PM:
I have to replace the lamp in a Barco DP2K-23B for the first time, and I’m having a hard time finding a torque wrench that is precise enough to follow to the torque specifications listed in the manual, which range from 2.5 Nm to 25 Nm. Most of the wrenches I’ve found don’t meter below 10 Nm and the steps between each setting are too large.
The previous guy apparently tightened them to feel, but I'd like to do it the right way because our service technician and another technician I consulted both warned that if everything isn't tightened correctly the lamp current can burn out the electrical connections.
Can anyone provide a recommendation?
Posted by Bob Ezra (Member # 841) on 05-25-2016, 06:07 PM:
http://www.amazon.com/TEKTON-24320-4-Inch-Torque-20-200-Inch/dp/B00C5ZL2EG?ie=UTF8&psc=1&redirect=true&ref_=oh_aui_detailpage_o02_s00
Posted by Monte L Fullmer (Member # 2797) on 05-25-2016, 06:46 PM:
5mm Allen locks down the cathode adapter onto the rear part of the seal of the bulb.
Just snug that down to where you cant turn the allen setscrew by hand-maybe about 12 inch pounds.
The Anode connection is interesting.
The large Allen setscrew is for an 8mm Allen.
But I hold the block with an adjustable (crescent) wrench then loosen the Allen set screw with the 8mm wrench.
When tightening down that Allen setscrew, I tighten down where it can't turn anymore, like 10 FT LBS. Don't want to go too tight since you're threading a steel screw into an Silver alloy connector.
Insert assembled bulb in the module, have the anode cable be in the same direction as the anode connector, since the connector comes out with the bulb on change.
After inserting the bulb, replace the front heat shield (try not to touch the front glass, for fingerprints will damage the coating on the glass).
Then pull the bulb forward and turn the bulb so the rear adapter locks in the castled nut where the bulb then cannot be turned.
Then, replace the lockdown Allen screw with the 5mm Allen and just snug tighten - maybe 1 ft lb - this bolt down-don't over tighten or the brass stud on the adapter will break.
Slide module back in place and do the bulb alignment through the Barco Communicatior Installation tab.
Good luck
Posted by Manny Knowles (Member # 1171) on 05-26-2016, 01:11 AM:
For the allen screws:
Tohnichi RTD500CN Torque Screwdriver
Note: Does not include driver bits.
For the bolts:
Tohnichi QL25N5 Torque Wrench
Note: Does not include sockets.
I'm not an electrician, but I spoke with one a few years back about this notion of "doing it by feel" and he told me that if a manufacturer specifies a torque value, you have to apply that torque value using a torque wrench/screwdriver. If the manufacturer does not specify a torque value in the literature (for an electrical connection) then you should contact them and request documentation that specifies a torque value.
Posted by John Roddy (Member # 7348) on 05-26-2016, 05:12 PM:
quote: Manny Knowles
I'm not an electrician, but I spoke with one a few years back about this notion of "doing it by feel" and he told me that if a manufacturer specifies a torque value, you have to apply that torque value using a torque wrench/screwdriver. If the manufacturer does not specify a torque value in the literature (for an electrical connection) then you should contact them and request documentation that specifies a torque value.
I'd call that a little bit extreme. Torque values are not always absolutely critical, but there are plenty of people who freak out if they can't find one. In this case, it's not for structural integrity. It's just to ensure good contact for a crapton of current to flow through. And that's only for the primary one that's on the lamp (the one with the very high torque spec). The rest are just fasteners. They don't really serve much of a purpose other than to hold everything in place. I'd argue that they can be comfortably dealt with just by feel. The important one is the anode SPG connection, so if you're forced to choose between two different tools, it makes more sense to me to go with the one that can meet the SPG spec.
Posted by Steve Guttag (Member # 268) on 05-26-2016, 06:31 PM:
Here is the thing...there is noway to qualify "feel".
If you specify a torque, it takes the person out of the equation. Once you have a measurable number, then if you, or I or Jesse here use the torque driver/wrench, we all should do an equivalent job.
Note, torque not only ensures the good electrical connection but it also serves to prevent you from damaging the equipment too.
Most don't seem to realize that brass is a soft metal and that over torquing a screw in it will deform its threads and make that screw difficult to loosen/tighten in the future. People wring off heads of screws or crack set screws all of the time due to over-torquing.
Once a manufacturer specifies the torque, they've done their job to tell you how tight to make it.
Tighten "firmly" and other such descriptions are too ambiguous.
I'm still at a loss as to why Barco doesn't use a split washer on their Anode connection (or a wave washer). That alone would take a lot of the risk out of the torque specification on the ring lug. You want fully contact with the ring lug and you also don't want the thermal cycles to loosen the fastener. They are depending on a degree of metal deformation to ensure all is satisfied.
Posted by Manny Knowles (Member # 1171) on 05-26-2016, 07:20 PM:
Are there legal ramifications for ignoring torque specifications for an electrical connection?
Posted by Chris Markiewicz (Member # 1415) on 05-26-2016, 07:30 PM:
We use the 1/4" drive Harbor Freight torque wrenches for about $22. Torque range is 20-200 in/lbs. They work well on our Barco 32Bs.
Another thing to check on bulb changes is to make sure the washers and nut on the anode connection are not oxidized or damagesd. rubbing down with #800 wet/dry paper on a smooth surface will clean them right up.
Posted by Monte L Fullmer (Member # 2797) on 05-27-2016, 03:08 AM:
quote: Steve Guttag
They are depending on a degree of metal deformation to ensure all is satisfied.
Maybe why of the reason in using silver alloy for the use for the flat washers being a soft metal against that nickel plated copper ring lug .. to have that "give" when tightening either the 8mm ALLEN, or either, the 17mm, or 22mm nuts for the anode connections.
Posted by Dave Macaulay (Member # 813) on 05-27-2016, 01:08 PM:
Tighten the 5mm SS Allen bolt to the cathode connector reasonably tight. I don't believe "1 ft/lb" is enough: the adapter is not fragile, and leaving it too loose will cause overheating and, possibly, expensive parts. Check that the nut on the cathode cable connector block is tight occasionally. Damage from loose connections is at your expense, no warranty covers that.
You can get the anode cable, adapter, bolt, and washers as a kit.
Any parts other than that on the cathode support require the entire XYZ plate be replaced... a recently available part - previously you had to buy a complete lamphouse.
Posted by Steve Guttag (Member # 268) on 05-27-2016, 01:22 PM:
The 5mm Cap screw need not be overtightened. Cathode adapter is soft and the threads WILL deform if you crank on it. You can tell when this happens if the screw is stiff to unscrew and screw back in.
You have a LOT of contact area on the Cathode adapter. There are many threads going into it and there is a significant amount of the adapter that goes into the receiver. There is also a lock washer that will tend to keep it from self-loosening. Don't get me wrong, it has to be torqued properly or it will still burn up but it need not be done excessively.
It is worth checking the Cathode cable that connects to the brass receiver (under the spring and such)...if THAT becomes loose, you will burn up that fitting and likely fuse the cathode adapter. I've seen that happen.
The XYZ adjust has been available for some time now (years). Slowly but surely, more and more Barco parts are becoming available rather than having to get crazy expensive assemblies.
Please also note, The anode connection that fits onto the SPG is not listed in the DP2K-C parts list but it is the same as the DP2000s. It is part number: R7242451K I'd have one on hand since if the positive lead isn't tightened well, it WILL burn up.
For the "B" series lamphouses there are two variants of the contacts...make sure you get the right ones for the age of your lamphouse.
Posted by Justin Hamaker (Member # 2165) on 05-27-2016, 02:50 PM:
On a related note, last night I change the bulb on our Barco 32B. When I initially tried to remove the lamp enclosure it would not pull free.I could tell there was something holding it in place in the top left corner. Turns out it was something about the anode connector. I had to remove the plastic cover on the back side of the projector so I could get it to pull free.
Once I had the lamp enclosure free I did a visual inspection and everything looked fine. It slid back into place very smoothly after changing the bulb.
The only thing I saw that looked to be damaged was some charred insulation on the anode wire near the connection on the back side of the projector. Since there was no charring or discoloration on the bolt, I assume it probably is from the heat of a 6500 watt bulb on the other side of the aluminum.
Posted by Monte L Fullmer (Member # 2797) on 05-27-2016, 03:34 PM:
I learned from experience on the cathode cap - I tightened a bit too tight on the screw and broke off the brass end of the cap.
Until I got another adapter, I had to get a longer 5mm screw to reach the remaining threads of that cap.
Thus, I thread in the screw until snug then give a light turn until once "creaking" sound knowing the screw have the adapter tight in the castle nut.
We also had the experience of when the cathode seal setscrew wasn't tighten down: back end was destroyed due to weak contact creating tons of heat. Replaced the back end of the module to make the fix.
Posted by Dave Macaulay (Member # 813) on 05-27-2016, 03:57 PM:
Whatever.
This one had the screw left "snug" but not as tight as I would teach them.
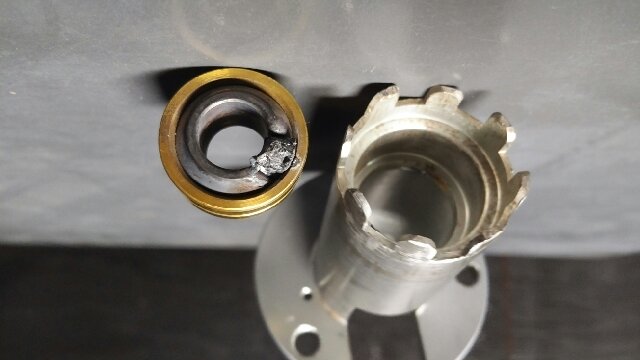
I have no idea why the fricking pic is upside down. The 20C lamp current arced through the swivel and turned a spot to slag. This is an odd metric size ball joint that I could not find locally.
All cable nuts were tight. Only the cathode screw was a bit less than tight, adapter was OK except for arcing damage. The Z adjuster thumbscrew was black, its bolt was badly damaged, and the locating pin was fused to the cathode tube with the C clip ruined. Several other projectors at the same site had discoloured Allen screws from overheating and were all not tight enough. You don't have to be Samson about it but make them tight.
Posted by Jesse Crooks (Member # 9389) on 06-04-2016, 08:06 PM:
Thanks, everyone! I bought the Tekton torque wrench that Bob suggested and it worked well. The stated maximum is 22 Nm, but I was able to adjust it beyond that to the 25 Nm required for the cathode connection. I think I would have preferred a torque screwdriver for the 2.5mm set screws on bulb adapters since it's a more delicate job. The wrench was a little awkward when trying to keep the bulb stable.
Posted by John Roddy (Member # 7348) on 06-05-2016, 12:51 PM:
quote: Steve Guttag
I'm still at a loss as to why Barco doesn't use a split washer on their Anode connection (or a wave washer). That alone would take a lot of the risk out of the torque specification on the ring lug.
They actually did. And then they sent out an Info-T telling everyone to get rid of them ASAP and go back to flat washers.
Again, this is a connection for electrical contact, not structure. This is why I had good results with filing the surfaces. The largest the surface area that's met up between the lug, washers, and nuts, the better. That's why the star washers are no good. Great for keeping them in place, but awful for transferring the ginormic amounts of current that the lamp needs. The split washers are no good either since…well, they're split washers. For small screws that don't really see much vibration or anything, they're all right. But large ones on giant threads are more of a party favor. I've yet to see any of these connections come loose when they're just torqued properly with large flat washers. Don't forget, that increased surface area also means more friction holding it in place.
Posted by Steve Guttag (Member # 268) on 06-05-2016, 07:56 PM:
They had STAR washers, never split washers. As for split or wave washers, their vailue has only been proven by oh about 50 years in xenon lamp usaage. The purpose of the split or wave washer is to prevent loosening.
The problem with the star washer in this application is that it will reduce contact area AND they will dig into the silver (a relatively soft metal). In fact, they also removed one of the flat washers on the "C" lamphouse but kept both in for the B lamphouse so on one side, you only have the nut's contact area to transfer the current. You should have a flat washer on both sides of the ring lug for maximum contact area and the flat washers don't get their suface damaged since they only contact the ring lug. Then put a split washer (or wave washer) and then the nut to finish the connection. Then you have maximum contact area for current transfer and a mechanical connection that is going to be more secure and survive heating/cooling cycles better than mere torque.
Posted by Monte L Fullmer (Member # 2797) on 06-08-2016, 03:59 AM:
quote: Steve Guttag
You should have a flat washer on both sides of the ring lug for maximum contact area and the flat washers don't get their suface damaged since they only contact the ring lug.
What would be the recommendation on this - can one use a copper washer as the second (which one can readily find in hardware stores), or stay with the silver alloy as the second washer?
I presume that a regular steel washer isn't the best choice due to current flow.
thx - Monte
Posted by Steve Guttag (Member # 268) on 06-08-2016, 04:37 AM:
The recommendation?...Well Barco has already recommended and I will not provide a how-to that contradicts the manufacturer. My critique was just that. What the current design provides is a semi-precarious connection that is dependent on semi-precise torque to prevent failure.
When mixing metals, one has to be a bit careful as they do not always react well together. I would also say that merely adding the second washer without taking into account the potential change in torque requirement isn't advised (you now have another semi-resilient item to account for (Barco had it on the "C" lamphouse and removed it, yet retained it for the "B" lamphouse). The addition of an appropriate wave washer (or split) would put the burden of maintaining the mechanical connection more onto the properties of the wave/split washer (still needs to be torqued but more forgiving).
Powered by Infopop Corporation
UBB.classicTM
6.3.1.2