This is topic Lamp Installation Troubleshooting Question Barco DP2K-15C in forum Digital Cinema Forum at Film-Tech Forum ARCHIVE.
To visit this topic, use this URL:
https://ft-forum.com/ft/cgi-bin/ubb/ultimatebb.cgi?ubb=get_topic;f=16;t=002917
Posted by Angel Tianpiboonsiri (Member # 9783) on 01-15-2017, 07:25 PM:
Okay, I'm not the most experianced projectionist yet. And I couldn't directly find instructions on how to do this, so I turned here. (If any of you know a site that has great photos of the removal and installations of lamphouse parts, let me know. Please, thank you.)
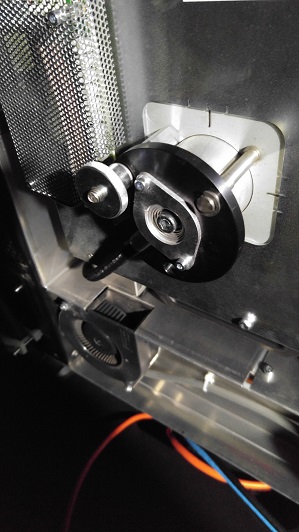
Anyway. Here's the break down of my question. Inserted is the photo of what I would like to completely take out of the housing.
The reason being for my latest install of a blub, which went fine when installed the previous time, to having a hard time getting that allen screw to make contact with the cathode. (You know that telltale sign when it isn't when the screw 'whines' or squeaks a little and doesn't fasten properly?) After which, I reseated everything, the cathode adapter on the bulb caught on the allen screw, I was able to tighten it, returned it to the projector, and then struck the bulb. Threw white light up, and it was gray, and dark. I loosened the X-axis and it started to lighten up everything and the brightness was acceptable. (I had a set starting in 20 minutes and couldn't play with it more.) However, the X-axis is noticeably looser. This is what I now suspect happened with a previous lamp house we had.
All that said, I want to see what's going on in that assembly that is causing this issue when nothing was deviated from normal routine lamp installations.
Any suggestions or help would be super helpful.
Thanks in advance.
-Angel
Posted by Marco Giustini (Member # 4544) on 01-16-2017, 02:26 AM:
Make sure the lamp adaptor on the reflector side is fully engaged into one of the slots. You can inspect the cathode end from the air vent located on the side.
When aligning, use the dedicated section of the communicator, don't just look at the screen!
Posted by Gavin Lewarne (Member # 5397) on 01-16-2017, 02:41 AM:
The lamp adaptor that you screw on to the cathode of the lamp is castellated on the far end, where it engages with the lamphouse. You have to make sure you engage it properly in the lamphouse (rotate the lamp a little while inserting it against the end) so the castellations match up and slot into each other.
If you don't do this, you risk having massive X-axis misalignment and the very problem you are facing
Posted by Brant Veilleux (Member # 2877) on 01-16-2017, 02:56 AM:
In my honest opinion, you need to stop and call a professional. You are in deep water and could injure yourself, others, and do a lot of equipment damage. I appreciate you want to learn, but changing a xenon bulb is not like changing an average light bulb in your house. Experienced Technicians and Engineers should only perform such tasks.
Posted by Marco Giustini (Member # 4544) on 01-16-2017, 05:51 AM:
I'm with Brant here. If you haven't been trained, ask for a professional to train you first
Posted by Dave Macaulay (Member # 813) on 01-16-2017, 09:01 AM:
There are a couple of lamp change videos, I like this one because it shows very clearly the pin alignment at the cathode tube. It's a different lamphouse model but only the door and anode cable connector are much different.
https://youtu.be/3YM94ZtOwVg
Posted by Angel Tianpiboonsiri (Member # 9783) on 01-16-2017, 02:41 PM:
Thanks for the advice and caution - I appreciate it, fully.
Posted by Monte L Fullmer (Member # 2797) on 01-19-2017, 03:49 PM:
Just don't cramp down on that 5mm allen bolt at the end on the module too much, or you'll snap off the end of the adapter being solid brass.
Just a tight snug is all you want.
Yet, the big important thing is the allen set screw that pinches on the cathode seal of the bulb.
This set screw really has to be snug down.
For this being tight makes the solid current connection for the bulb, not the adapter itself.
If that setscrew isn't tightened down, all that negative current can destroy the back end of the module with all the heat created from high resistance.
Had an operator do that when he was doing a changeout with snapping off that end of the adapter.
Thus, while waiting for a replacement adapter, I had to add a longer allen bolt to match the length that was broken off to keep bulb focus in check.
Digital is so much fun to play with.
Good luck - Monte
Posted by Steve Guttag (Member # 268) on 01-19-2017, 04:40 PM:
Believe it or not, no. The screw you are calling a "set screw" doesn't need to be any tighter than the one that holds the adapter into the focus carriage. Both have a 2.5 Nm specification. What carries the current is the enormous contact area with the threads. In both cases, you have a lot of metal-to-metal contact to keep the resistance low. You want them snug enough to force those threads to interact. in the case of the screw that holds the adapter on, it is mostly keeping the adapter from loosening up and it will force the adapter to snug into the threaded portion of the lamp. Most of the contact is achieved, however, in how you screw that adapter onto the lamp...you want that snug too and let the set screw keep it there.
The scary areas on Barco are where their ring lugs attach. They don't use wave-washers so if it it loosens in the slightest due to heat expansion, you will start to destroy the connection/connectors.
Posted by Monte L Fullmer (Member # 2797) on 01-19-2017, 04:51 PM:
Thx for the update - just what I was told from the beginning when I was shown Barco.
Thing I noticed that the Anode connection on the 32B uses two flat washers where the ring connector resides between the washers, where the C series uses just one that presses down on the ring connector on the lower jam nut of the anode connector.
My big thing is why the oddball anode connector for the 23B units, that takes a 8mm Allen to break that set screw loose on the ring connector. I use a crescent wrench to hold the assembly with left hand while I use a long arm 8mm to break and tighten the Allen.
I still get spooked on that 6inch cathode adapter-the weight of all that brass while holding that bulb horizontal while sliding it in that castle nut.
After I do the bulb install and while the module is on the bench, I press on the focus area to see if the bulb can slide back and forth without resistance. Any pinch, and you can remedy the issue right then.
You don't want a pinched bulb, for when they get hot, they expand and a pinched bulb will explode in a heartbeat.
Powered by Infopop Corporation
UBB.classicTM
6.3.1.2