This is topic Barco lamp alignment issue in forum Digital Cinema Forum at Film-Tech Forum ARCHIVE.
To visit this topic, use this URL:
https://ft-forum.com/ft/cgi-bin/ubb/ultimatebb.cgi?ubb=get_topic;f=16;t=003543
Posted by Pratheesh Chandran (Member # 10719) on 01-06-2019, 05:15 AM:
Barco dp-2k 20c projector shown only .20fl after changing lamp.after align x,y and z axis its shown only .40 fl max. brightness is low.seems it s lamp house prblm..any other options??
Posted by Marco Giustini (Member # 4544) on 01-06-2019, 05:32 AM:
The brightness sensor needs to be calibrated regularly. If it was never calibrated, chances are it just doesn't read anything meaningful.
Was the old lamp showing similar values?
Do you have another lamp to try?
Is the lamp fully seated on the socket? It's a common issue where the lamp end does not sit inside the gaps. Loosen the lamp bolt and carefully rotate the lamp in both direction, you should be able to see a very little rotation allowed before hitting a stop. You can also inspect the socket via the side window, through the mesh.
Are you reaching the end of any of the adjustment axis?
How does the brightness look on screen?
Posted by Dave Macaulay (Member # 813) on 01-06-2019, 08:43 AM:
Is the screen actually that dark? That would be very very dim. The number shown during alignment is arbitrary and usually set to actual screen brightness when doing color calibration so that you can use the CLO system to automatically maintain brightness as a lamp ages.
If it is super dim on screen:
Is the CLO reading on the graph still going up but you run out of X movement (the centre knob)?
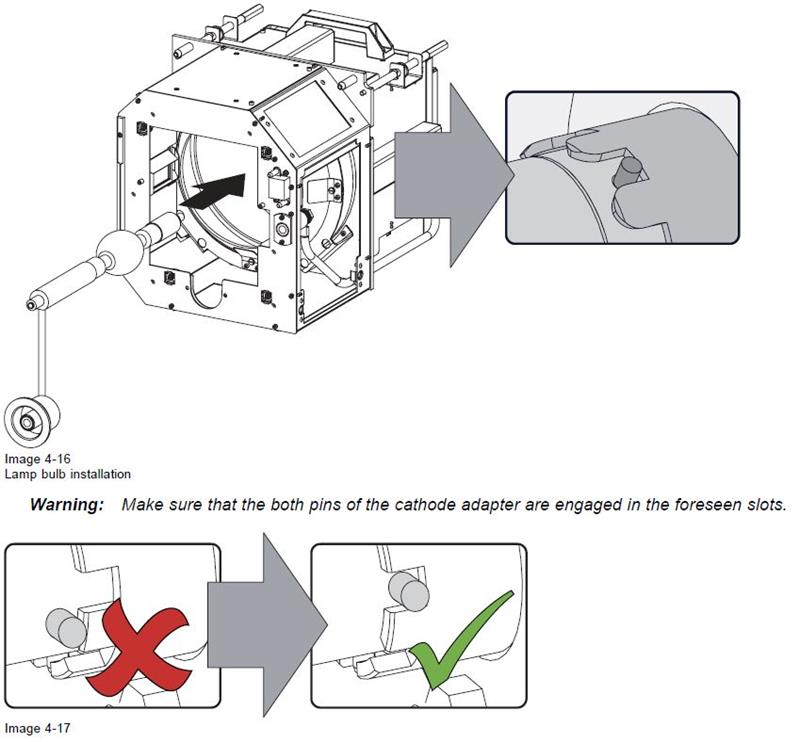
If so, the lamp cathode adapter pins may not be in the notches, but that's a noob mistake and unlikely for experienced staff. The other noob mistake is to have the anode end hanging, not in its socket.
The swivel bushing the cathode adapter seats into can and does slide out of its seat a bit, causing the same effect. You can see it with the lamp out, the face of the bushing outer shell should be roughly flush with the aluminum housing. You need to remove the cathode mount assembly - the sliding metal tube - to access the bushing and tap it back in.
Your new lamp may be defective. Check that a different lamp, even the just removed one, will give decent readings and peak during alignment.
Posted by Monte L Fullmer (Member # 2797) on 01-07-2019, 12:48 AM:
I sometimes do the old "Looney Tunes" coarse bulb focus by bringing up the white screen display in the test mode and align the bulb where the screen had even field of light if I can't do it in the Communicator.
I bet the 5mm allen screw wasn't put back in on the cathode end and the bulb moved way far forward in the module.
Or, the screw was put back in, but the pins on the cathode adapter missed the slots in the castling nut on the other end so the bulb can't be locked back into position, where you'll never get the right focus.
Posted by Pratheesh Chandran (Member # 10719) on 01-07-2019, 02:12 AM:
same issue for the standby lamp..when turn x axis the black metal part moves and fl turns low ( .40 to .20) but when x axis released there is no movement in the above part and it stuck ..after turn x axis opposite direction and pull back the metal part with hand the fl showing increasing value( .20 to .40 )..and also noticed increasing and decreasing brightens respectively on the white test pattern.
Posted by Marco Giustini (Member # 4544) on 01-07-2019, 04:11 AM:
.20 or .40 is still nothing.
Are you suggesting that the X axis adjustment only works in one direction and you have to pull the lamp socket by hand to move it? Those controls have some play, but if the socket moves in only one direction, then you may require some parts.
I never inspected that mechanism but I don't think you should be able to move it by hand.
Posted by Pratheesh Chandran (Member # 10719) on 01-07-2019, 04:38 AM:
YES. the X axis adjustment only works in one direction I have pull the lamp X Adjustment part by hand to return the original position (for max fl). may be that part is malfunctioning .
Posted by Dave Macaulay (Member # 813) on 01-07-2019, 05:47 AM:
Sticky cathode tubes are fairly common, if you take it out and clean the tube and bore then add some lube (a bit of oil) it loosens up.
If you pull the tube all the way back (there should be a stop but don't screw the nut all the way off) and it still would be brighter further back, look for the bushing issue or the pins issue... and confirm the adapter is screwed all the way down on the lamp.
Posted by Pratheesh Chandran (Member # 10719) on 01-07-2019, 11:01 PM:
I am sorry i write a mistake...i mean z axis .. the part i pull back is the black metal attached to z axis..today i loosen the z axis screw and pull back the metal part and tight the nut..now its gave better around 1.10 fl...but a little flickering in the screen..
Posted by Marco Giustini (Member # 4544) on 01-08-2019, 04:13 AM:
Z axis getting stuck is common. As Dave said, put *a little* lubricant (high temperature) on the pins where the adjustment runs and also between the rod and the washers, to remove that "grinding" feeling. Pulling it by hand, carefully, also works.
Again, the footlambert reading on the communicator is relative to a calibrated value. If it was never calibrated - or the calibration file somehow got lost/corrupted - then you will read random values. I ask you again: how does it look on screen?
Try this: calibrate the light meter using a random higher value - say 10 - and then try adjusting the lamphouse again. Save on a different file just in case and make sure it is active when you calibrate again. I had a situation once where the light sensor was miscalibrated and all it would read was 0.x.
Posted by Pratheesh Chandran (Member # 10719) on 01-08-2019, 05:44 AM:
screen brightness is too .its looks like 1000 w lamp output :-)
Are you suggesting in normal mode Calibrate current light output to 10 .. and save it ..ok i will try.
Posted by Dave Macaulay (Member # 813) on 01-08-2019, 12:39 PM:
Yeah I get confused by X,Y,Z too.
Again, if the Z axis (not X...) adjustment moving back (unscrewing the nut and pulling on the tube) increases the reading and it's still increasing it when the tube can't move further out: something is wrong. Maximum reading should be reached with the adjustment a few mm shy of fully out.
Possibilities:
- the lamp cathode adapter (brass thing) is not screwed on all the way
- the adapter pins are not dropping into the slots in the tube, or the tube is damaged and won't let them all the way down
- the swivel bushing has shifted out in its bore
- the lamp is defective
I would take the lamp out, confirming the pins are seated once the allen screw is loose - the lamp should only rotate a tiny bit when the pins are in slots. Then confirm the adapter is screwed down flush with the lamp cathode end. Then take a look at the inside end of the lamphouse cathode mount with a flashlight: in the centre is the swivel bushing, shiny centre with a dark ring. The ring must be flush or below the aluminum cathode tube, all the way down in the centre bore.
If all that looks good, replace the lamp with a new or used one. If the lamp has gone black, or the anode electrode is deformed, or either electrode is a weird colour, that's a sign of a bad lamp as well.
To push a slipped bushing back in you need to take the cathode tube out and hammer it back in, using something that won't damage it. If you need to do that, check that the bushing ball swivels freely - if not, put a drop of oil around it then twist it around with a screwdriver to loosen it up. The tube may be really hard to pull out as the "fingers" can get bent out, it will pull out though with force and twisting (once off the alignment shafts and threaded rod). You need to take the shiny cap thing off and remove the spring and cable end first as well as the thumb nut and washer, plus there should be a clip on one of the alignment shafts to limit its rearward movement.
Assuming the reading was calibrated and you really have very poor screen brightness I would not change the LSC file calibration for an active macro for flat or whatever. You can make a new macro (name it LSC or something) with only the one command, changing the LSC calibration. Make it 20 or so, then execute a normal macro followed by that macro. This gives you a number that's reasonable and the graph will show a decent change as you adjust the lamp. Next time the real macro executes it will go back to the existing LSC calibration.
Posted by Pratheesh Chandran (Member # 10719) on 01-08-2019, 10:07 PM:
yes ..i will try ..
Posted by Pratheesh Chandran (Member # 10719) on 01-09-2019, 03:41 AM:
its showing better results.. when i loose the nuts ..fl changes and showing better values..i think the cathode of lamp not correctly suite in the socket..
Posted by Leo Enticknap (Member # 534) on 01-09-2019, 07:45 AM:
The socket into which the cathode end of the lamp sits (through which the Allen-headed bolt goes) has recesses into which the locking pins on the shaft of the lamp have to engage. Holding the anode end of the bulb and the socket assembly from the back, rotate the bulb gently until you feel the pins go into the recesses, then thread and tighten the bolt.
If the back of the bulb isn't seated properly, you'll feel that it's too tight when you fit the UV blocker at the front of the lamphouse (unless you're using the wrong adapter).
Posted by Dave Macaulay (Member # 813) on 01-09-2019, 10:33 AM:
"its showing better results.. when i loose the nuts"
Can you explain this better? What nuts?
Posted by Monte L Fullmer (Member # 2797) on 01-09-2019, 06:26 PM:
Plus, that 5mm allen setscrew on the cathode adapter, the screw has to be metal tight on the collar of the bulb after the bulb is securely screwed in tight on the adapter.
That is what is making solid contact for the DC current to the bulb, not the brass adapter.
If that screw isn't snug down tight enough, that whole back end assembly could over heat and the brass castle nut will seize the adapter making a total replacement of the back end of the module-let alone burning up the cathode cable from the LPS since DC current runs from cathode to anode.
little help there.
Posted by Dave Macaulay (Member # 813) on 01-09-2019, 08:36 PM:
"metal tight"?
The screw should be fairly tight (2.5Nm/22in-lb spec for all C projectors, 5Nm/44in-lb for B models) but over-tightening them can break the adapter (there is not much metal around the threaded hole especially on C adapters).
Posted by Marco Giustini (Member # 4544) on 01-10-2019, 04:47 AM:
From the installation manual. Please make sure the lamp is fully seated on the socket. The pin should end up in a slot. You can see the socket through the metal mesh on the side of the lamphouse.
Posted by Steve Guttag (Member # 268) on 01-10-2019, 07:25 AM:
No Monte, you are wrong.
The bulk of the current flow should be through the threads. You have WAY more contact area there.
The screw does two things. The obvious one is that it secures the adapter to the lamp so it can't back off. The other function is probably what sets up the confusion, it will force the adapter to push tight (on the threads) to the lamp and use that contact area.
For the non-threaded adapter, it is the same. That is, the screw holds the adapter on and also forces the adapter to have a tight connection to the pin of the lamp. In the bigger projectors (DPxK-32B) do you really think that small set screw is what is carrying the bulk of the current?
Why an adapter can weld on if the screw is loose is because the adapter is now loose to the treads/pin and that is where it will start arcing.
Posted by Monte L Fullmer (Member # 2797) on 01-11-2019, 01:47 PM:
...what our tech told us that the allen setscrew was the main so to hold the threads together in contact with cathode and adapter.
Granted, the 5mm end screw .. just barely a sinch tight, or you'll break the end off of the adapter being just brass-we learned that one the hard way
oh well ... - Monte
Posted by Pratheesh Chandran (Member # 10719) on 01-12-2019, 02:06 AM:
thank u all... any other option for focusing screen manually in BARCO ( tried focus adjustment switch in the projector)..seems some focusing problems .. pic seems out of focus in some areas..any Other option ??
Posted by Marco Giustini (Member # 4544) on 01-12-2019, 06:21 AM:
Pratheesh, you'll likely need to perform the "scheimpflug" adjustment.
However, may I recommend that you hire a qualified engineer for this procedure - and to help with the lamphouse?
Powered by Infopop Corporation
UBB.classicTM
6.3.1.2