Laser Alignment tool

Collapse
X
 
  • Time
  • Show
Clear All
new posts
  • Walt Shires
    Film Handler
    • Feb 2024
    • 47
    • Austin, Texas

    #1

    Laser Alignment tool

    After reading about the alin-o-tron device I decided to print something like it up to try to get better light out of my Super Lume-X than I was getting. I just felt like it was never "right."

    After using it (and I'm not going to pretend that the laser coming out is PERFECT - It's from Amazon - but I rolled it on the ground and the laser was in "about" the same spot as I rolled it) the light seems much better and the reflector is much better lined up - I feel this is the case because it burned even MORE stuff off the back of the projector/shutter. I suck my hand in there and was almost burned and it's "only" a 1K watt bulb. Anyway - here is what it came out like. It seems like a very worthwhile tool.


    IMG_1287.jpg
    The disc for the snoot to line up the front - the hole is printed so it's in the middle for sure.
    IMG_1289.jpg

    The disc for the reflector hole in the back - it has a hole to line up the laser - then I glued the mirror to it when I was ready for the mirror part. The hole being printed is always in the center and "perfect"
    IMG_1288.jpg
    Attached Files
  • Ryan Gallagher
    Film God
    • Nov 2022
    • 2855
    • Austin, Texas, USA

    #2
    So one area of improvement is to not use the "snoot" as the center reference. It may have been fairly well centered on the center of the 35mm gate but no guarantees.

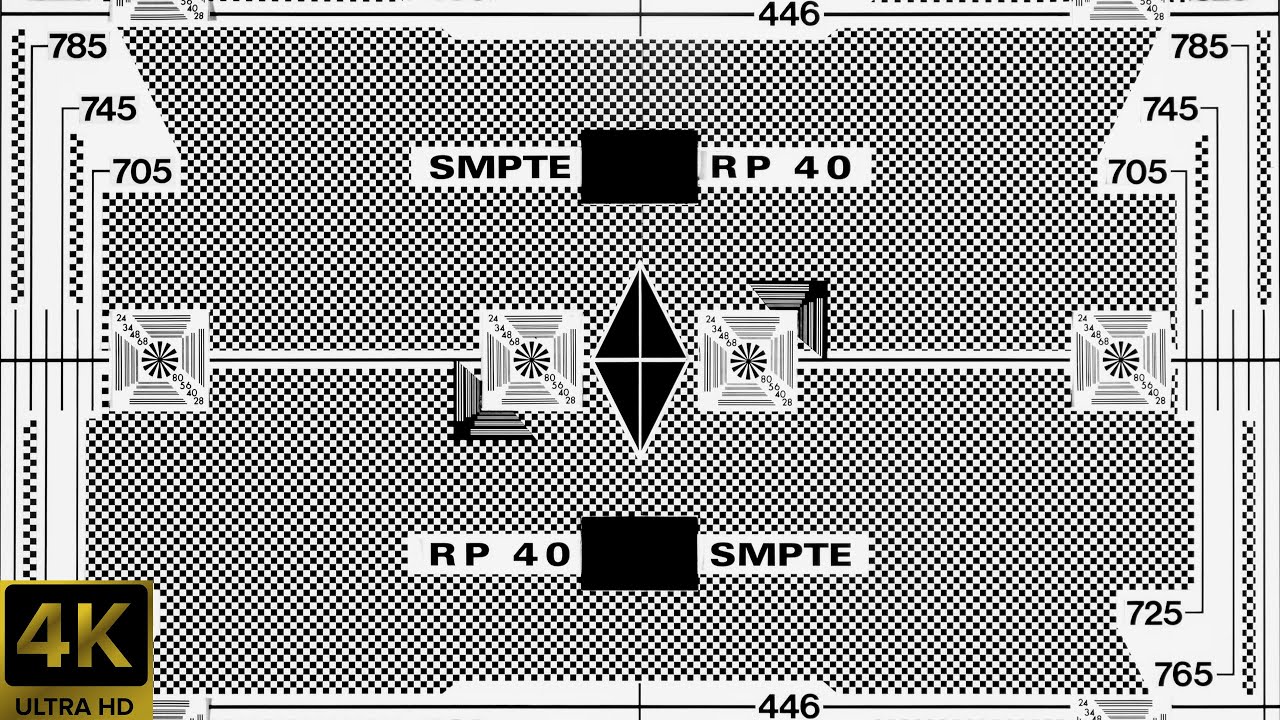
    One alternative method is to use some PA35 or RP40 framed correctly in the gate, Another method is to find a "pinhole aperture plate" and verify it is fact centered relatively to a correctly framed PA35/RP40 first.

    Depending on the lamphouse style some kits came with little pinhole rings you could place in the anode holder too. Needing that depends a bit on what you are trying to align, depending on the lamphouse it may be a multi-variable type adjustment.

    But I have no doubt that what you built got you closer to alignment than you were! Great job!

    With a properly centered laser module (they can be purchased with various tolerances), you basically have a perfectly functional 3d printed align-o-tron. Great use of 3d printing for the industry. Tolerances may not be perfect with filament material, but they can definitely get you close from a worse starting place.

    Other than rolling, if you have a cheap machinists "V-Block", you can turn the round object in that and observe if the laser stays stationary... longer throw will magnify any centering error too.

    The other gotchya with the align-o-tron methods are that the reflector needs to be undamaged and not warped with heat/age. That plug and mirror really needs to be perpendicular to the reflector optical axis, and many reflector designs were known for warping over time.

    PS in a happy projector you should not be "burning off" material on the shutters... Typically the only burn damage you would see on shutters is due to operators failing to manually dowse the lamp when the shutters are not rotating. Similarly for any change-over devices, protect those with the main dowser too.

    Most types of optical adjustments to the light field need to be done with the projector running for this reason too.

    Comment

    • Mark Gulbrandsen
      Film God
      • Jan 2020
      • 3093
      • Nashville, TN

      #3
      Greg Mueller made the original Align-O-Trons.... He moved from Washington State to Northern New Mexico to do telescope stuff. Not sure what happened to him beyond that....

      Comment

      • Walt Shires
        Film Handler
        • Feb 2024
        • 47
        • Austin, Texas

        #4
        Hopefully he is OK and doing well - the idea was a good one.

        I finally watched some film on it last night and the picture seemed noticeably brighter. And when it ran out - where there was no film running - the white was very even around the screen. (I did run in there to close the doser as quick as I could but took a second to take in the light evenness). It was MUCH better than when I tried to line it up with the string. So it was a worthwhile thing to do - even with my hork-a-fied tool!

        What does the RP-40 look like? I don't have any of that so I can't quite visualize how it would work. Is it a target or something like that? I did look through the aperture plate (you can see it from the side when it's all open) and it appeared to be fairly well centered... so at least I know it wasn't WAY off - but obviously I don't know if it was perfectly centered...

        Comment

        • Ryan Gallagher
          Film God
          • Nov 2022
          • 2855
          • Austin, Texas, USA

          #5
          Originally posted by Walt Shires
          Hopefully he is OK and doing well - the idea was a good one.

          What does the RP-40 look like? I don't have any of that so I can't quite visualize how it would work. Is it a target or something like that? I did look through the aperture plate (you can see it from the side when it's all open) and it appeared to be fairly well centered... so at least I know it wasn't WAY off - but obviously I don't know if it was perfectly centered...
          SMPTE RP40


          SMPTE 35PA

          1200px-Rp_40.jpg

          Neither is designed for lamphouse alignment per say, but the center center diamond can come in handy when trying to check things with the align-o-tron. Obviously you can adjust the framing up and down for, so one quirk is you need to be relatively certain your framing is also centered first. If you have a pinhole aperture plate you trust that can be one method. But they've been known to be somewhat variable in manufacturing too. And if you have a good pinhole apperture plate you probably don't need to thread the test film to do the same laser test.

          Comment

          • Marco Giustini
            Film God
            • Jan 2020
            • 1168
            • Reading, UK

            #6
            I liked Kinoton's LED alignment tool more. The tool you built is great but it assumes that the mechanical centre of the mirror matches the optical centre of the mirror. Also that your tools and the glued mirror are perfectly from a mechanical alignment standpoint.

            I was told Kinoton had a different approach. An LED (not laser) in the centre of the lens - similar to your tool but with an LED. The light would be diffused in a conical shape, go through the gate, reach the mirror and reflect ON THE MIRROR itself and back on your tool. By tweaking the position of the tool in the holder, you would be able to see a round shape around the LED which is the LED conical light beam reflected back. If the shape is round and centred onto the LED itself, all is well. If something is misaligned, then you'd have an ellipsis or some non-circular shape. That method would not rely on mechanical tools but follow the light path which eventually the Xenon lamp would follow.

            I made a similar tool myself and I massively improved some lamphouses which had been aligned with the Cinemeccanica mechanical tool.

            Of course a mechanical alignment is a great start too!

            Comment

            • Ryan Gallagher
              Film God
              • Nov 2022
              • 2855
              • Austin, Texas, USA

              #7
              Yeah I think Kinoton's method would even allow you to find the best alignment on an otherwise warped reflector etc etc. Primarily because it used the optical properties of the light path rather than the physical properties. No laser replacing a string gonna do that.

              I'd like to try to invent one for our Century+Strong lamphouse configuration... but I haven't seen a detailed enough photo or description of the Kinoton design besides the LED source, which is easy enough. Might just have to put and LED on a stick one day and play with it to get the concept better.

              Comment

              • Jim Cassedy
                Film God
                • Jan 2020
                • 1450
                • San Francisco

                #8
                Originally posted by Walt Shires
                <edited>
                What does the RP-40 look like? I don't have any of that so I can't quite
                visualize how it would work. ...
                As Ryan pointed out, the RP-40 wasn't really created for lamphouse alignment, but on many occasions
                when I'm pressed for time to convert our projectors from 35 to 70mm or vice-versa, and there isn't enough
                time for me to do a 'proper' lamphouse check, I run loops in both projectors and do changevoers between
                them to get the light levels matched on screen. Also, since our 70/35 conversions usually require me to do
                some tweaking of the projector elevation and lens shift, running two loops with both dowsers open allows
                me to superimpose the images on screen, and have them centered and framed exactly the same. They
                also make me do this at almost every major film festival I've worked at, if I haven't already done it myself
                Last edited by Jim Cassedy; 04-07-2026, 04:46 PM.

                Comment

                • Ryan Gallagher
                  Film God
                  • Nov 2022
                  • 2855
                  • Austin, Texas, USA

                  #9
                  Originally posted by Jim Cassedy

                  As Ryan pointed out, the RP-40 wasn't really created for lamphouse alignment, but on many occasions
                  when I'm pressed for time to convert our projectors from 35 to 70mm or vice-versa, and there isn't enough
                  time for me to do a 'proper' lamphouse check, I run loops in both projectors and do changevoers between
                  them to get the light levels matched on screen. Also, since our 70/35 conversions usually require me to do
                  some tweaking of the projector elevation and lens shift, running two loops with both dowsers open allows
                  me to superimpose the images on screen, and have them centered and framed exactly the same. They
                  also make me do this at almost every major film festival I've worked at, if I haven't already done it myself
                  I’ve never thrown light outta both concurrently, still need to play with that fun variation. But I need better loop management first.

                  I will do effectively the same test but with A to B comparisons.
                  ;-)

                  Comment

                  • Paul Finn
                    Pro Film Handler
                    • Jan 2020
                    • 106
                    • Bay City, Michigan

                    #10
                    For Jim Cassedy: I understand having both dousers open at the same time. But, normally film projector systems only allow either (one) changeover shutter to be open at a time. Do you have a switch in the changeover chain to defeat this normal operation?

                    Thank you, Paul Finn

                    Comment

                    • Tj Hopland
                      Pro Film Handler
                      • Jun 2025
                      • 264
                      • Minneapolis, MN

                      #11
                      The American projector designs like the Century that Ryan and Jim have tended to use an externally mounted pulsed dual solenoid for the change over so you can easily operate them by hand and they will stay in what ever position you put them in.. European design tended to be more internal and required steady power to hold open, with no power they gravity close so with those you would need some mechanical method to 'wire' them open or some electrical method to alter the typical operation. There are/were exceptions and conversion kits so thats not a hard rule.

                      Comment

                      Working...